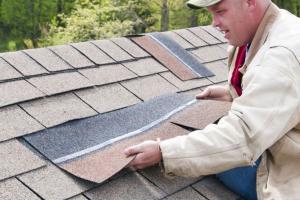
The Ultimate Guide to Easy DIY Asphalt Shingle Installation

-
Quick Links:
- Introduction
- Tools and Materials Needed
- Preparation Steps
- Installing the Underlayment
- Shingle Installation Process
- Finishing Touches
- Maintenance Tips
- Case Studies
- Expert Insights
- FAQs
Introduction
Installing asphalt shingles may seem like a daunting task, but with this comprehensive guide, you'll find it's easier than you think. Whether you’re looking to save money on labor costs or simply enjoy a hands-on project, this DIY guide will walk you through each step of the process, ensuring that your new roof is both functional and aesthetically pleasing. Asphalt shingles are one of the most popular roofing materials due to their affordability, durability, and ease of installation. Let’s dive into how you can successfully install them yourself!
Tools and Materials Needed
Essential Tools
- Utility knife
- Hammer
- Measuring tape
- Chalk line
- Roofing nail gun
- Ladder
- Safety goggles
- Work gloves
- Shingle cutter
Materials Required
- Asphalt shingles
- Roofing underlayment
- Roofing nails
- Flashing
- Ice and water shield (if necessary)
Preparation Steps
Before you start the installation process, it's crucial to prepare your roof properly. Here are the steps you need to follow:
- Inspect Your Roof: Check for any damage to the existing roof and ensure that the structure can support new shingles.
- Clear the Roof: Remove old shingles, nails, and debris. A clean surface is essential for proper adhesion.
- Check the Weather: Choose a day that is dry and mild. Extreme temperatures can affect the installation process.
Installing the Underlayment
The underlayment acts as a protective barrier against moisture. Follow these steps for proper installation:
- Roll Out the Underlayment: Start at the bottom edge of the roof and roll out the underlayment, overlapping each row by at least 6 inches.
- Secure the Underlayment: Use roofing nails to secure the underlayment, ensuring it lies flat and tight against the roof.
- Install Ice and Water Shield: In areas prone to ice, apply the ice and water shield along the eaves and in valleys.
Shingle Installation Process
With the underlayment in place, you’re ready to start installing the asphalt shingles:
- Start with the First Row: Begin at the bottom edge of the roof, placing the first shingle in position.
- Nail Down the Shingles: Use a roofing nail gun to secure each shingle, following the manufacturer's recommendations for nail placement.
- Stagger the Rows: Ensure that each row of shingles is staggered for proper water runoff and a professional look.
- Install Ridge Cap Shingles: Once you reach the top of the roof, install ridge cap shingles to finish the roof securely.
Finishing Touches
After installing all the shingles, take these final steps to complete your roofing project:
- Inspect for any loose shingles or areas that need additional adhesive.
- Clean up all debris from the roof and ground.
- Check all flashing and ensure it's properly sealed.
Maintenance Tips
To ensure the longevity of your new roof, consider these maintenance tips:
- Regularly inspect your roof for signs of damage or wear.
- Clear debris from gutters and roof valleys to prevent water buildup.
- Trim any overhanging branches that may scrape against the roof.
Case Studies
Let's look at a few real-world examples of successful DIY asphalt shingle installations:
Case Study 1: The Johnson Family
The Johnsons decided to install asphalt shingles on their 1,500 sq. ft. home. They reported saving nearly $3,000 by doing it themselves.
Case Study 2: Local Church Renovation
A local church took on a community project to reroof their building using asphalt shingles. Volunteers learned the process together, fostering community spirit and saving on costs.
Expert Insights
We reached out to roofing professionals to gather their thoughts on DIY asphalt shingle installation:
"With the right tools and preparation, homeowners can successfully install asphalt shingles. It's essential to follow manufacturer guidelines and prioritize safety." - John Smith, Roofing Contractor
FAQs
1. What are the advantages of asphalt shingles?
Asphalt shingles are cost-effective, easy to install, and come in various styles and colors.
2. How long does it take to install asphalt shingles?
The average DIY installation can take 1-3 days, depending on roof size and experience level.
3. Can I install shingles over existing shingles?
In some areas, it's allowed, but it's best to remove old shingles for a more secure installation.
4. What is the best time of year to install shingles?
Spring and fall are ideal due to milder weather conditions.
5. How many shingles do I need?
You can calculate the number of shingles needed based on the roof area, taking into account the coverage per shingle pack.
6. Do I need a permit for roofing work?
Check local regulations; many areas require permits for roofing projects.
7. What tools do I need for installation?
Basic tools include a utility knife, hammer, measuring tape, and roofing nail gun.
8. How can I ensure my roof is waterproof?
Properly install underlayment and flashing, and ensure shingles are laid correctly.
9. How do I maintain my asphalt shingle roof?
Regular inspections, cleaning gutters, and trimming overhanging branches are essential for maintenance.
10. What should I do if I find a leak?
Locate the source of the leak, and if necessary, consult a professional to assess the damage.