Ultimate Guide to Connecting Your Mac to the Internet: Step-by-Step Instructions

-
Quick Links:
- Introduction
- Understanding Internet Connection Types
- Connecting via Wi-Fi
- Connecting via Ethernet
- Troubleshooting Common Issues
- Advanced Settings
- Case Studies and Examples
- Expert Insights
- Conclusion
- FAQs
Introduction
Connecting your Mac to the internet can empower your productivity and enhance your overall user experience. Whether you are working from home, attending a virtual class, or simply browsing the web, a reliable internet connection is essential. In this guide, we will walk you through every step needed to connect your Mac to the internet successfully. From understanding different connection types to troubleshooting common issues, we’ve got you covered.
Understanding Internet Connection Types
Before diving into the connection process, it's important to understand the different types of internet connections available:
- Wi-Fi: A wireless connection that allows your Mac to connect to the internet without cables.
- Ethernet: A wired connection using a cable that directly connects your Mac to the router.
- Mobile Data: An option for using cellular networks through a mobile hotspot or USB tethering.
Connecting via Wi-Fi
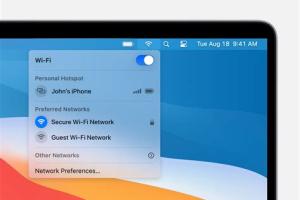
Connecting your Mac to a Wi-Fi network is one of the simplest methods. Follow these steps:
Step 1: Turn on Wi-Fi
1. Click on the Wi-Fi icon in the upper right corner of your screen.
2. Select "Turn Wi-Fi On."
Step 2: Select a Network
1. Click the Wi-Fi icon again to see available networks.
2. Choose your desired network from the list.
Step 3: Enter the Password
If the network is secured, you will be prompted to enter a password. Type it in and click "Join."
Step 4: Confirm Connection
Once connected, a checkmark will appear next to the network name, and you should see the Wi-Fi icon filled with black.
Connecting via Ethernet
If you prefer a wired connection, here’s how to connect your Mac via Ethernet:
Step 1: Connect the Ethernet Cable
1. Plug one end of the Ethernet cable into your Mac’s Ethernet port.
2. Connect the other end to your router or modem.
Step 2: Configure Network Settings
1. Open "System Preferences" from the Apple menu.
2. Select "Network."
3. Choose "Ethernet" from the left sidebar. Your Mac should automatically detect the connection.
Step 3: Confirm Connection
Check the status on the right side; it should say “Connected.”
Troubleshooting Common Issues
If you encounter problems while connecting your Mac to the internet, consider the following solutions:
- No Wi-Fi Networks Found: Ensure your Wi-Fi is enabled and that you're within range.
- Incorrect Password: Double-check the password you entered for the Wi-Fi network.
- Ethernet Not Recognized: Make sure the Ethernet cable is securely connected.
- Fluctuating Connection: Restart your router and Mac.
Advanced Settings
For users who wish to customize their network settings, explore the following options:
- DNS Settings: Change your DNS settings for improved speed and security.
- Proxy Settings: Configure proxies based on your privacy needs.
- Network Priority: Adjust the priority of your network connections based on your usage.
Case Studies and Examples
Let’s explore a couple of scenarios to help illustrate the connection process:
Case Study 1: Remote Work Setup
Jane works from home and needs a reliable Wi-Fi connection. By following the Wi-Fi connection guide above, she had her Mac connected in minutes, allowing her to participate in video calls without interruption.
Case Study 2: Home Office with Ethernet
Tom is a gamer who requires a stable connection. He opted for an Ethernet setup. By simply plugging in the cable and configuring the settings, he achieved a latency-free gaming experience.
Expert Insights
Experts recommend regularly updating your Mac to ensure compatibility with the latest networking protocols. Also, consider using a VPN for enhanced online security, especially on public Wi-Fi networks.
Conclusion
Connecting your Mac to the internet is a straightforward process that can enhance your productivity and enjoyment. By following the steps outlined in this guide, you should be able to connect via Wi-Fi or Ethernet with ease. Remember to troubleshoot any issues that arise and consider advanced settings for optimal performance.
FAQs
1. How do I check if my Mac is connected to the internet?
Click on the Wi-Fi icon in the top menu bar. If connected, it will display the network name.
2. Why is my Mac not connecting to Wi-Fi?
Common reasons include incorrect password entry, being out of range, or issues with the router.
3. Can I connect my Mac to the internet using my phone?
Yes, by using Personal Hotspot options available on most smartphones.
4. What should I do if my Ethernet connection is not working?
Check the cable connection, ensure the port is functional, and restart your router.
5. How can I improve my Wi-Fi signal on my Mac?
Move closer to the router, reduce obstacles, or consider using Wi-Fi extenders.
6. How do I forget a Wi-Fi network on my Mac?
Go to "System Preferences," select "Network," then "Wi-Fi," and click "Advanced" to remove networks.
7. Is using a VPN necessary when connecting to public Wi-Fi?
While not mandatory, a VPN enhances security and privacy on public networks.
8. How can I reset my network settings on a Mac?
Go to "System Preferences," select "Network," and use the "-" button to remove connections, then re-add them.
9. What is the difference between 2.4 GHz and 5 GHz Wi-Fi?
2.4 GHz has a longer range but slower speeds, while 5 GHz offers faster speeds over shorter distances.
10. How often should I reboot my router?
It's recommended to reboot your router at least once a month to maintain optimal performance.