Mastering Gmail: A Comprehensive Guide on How to Delete an Inbox Filter

-
Quick Links:
- Introduction
- Understanding Inbox Filters
- Why Delete Filters?
- Step-by-Step Guide to Deleting Filters
- Case Studies: Real-World Examples
- Expert Insights on Email Management
- Statistical Data on Email Management
- Common Mistakes When Managing Filters
- FAQs
- Conclusion
Introduction
In the modern digital age, managing emails efficiently is crucial for productivity. Gmail, one of the most widely used email platforms, provides users with powerful tools to organize their inboxes. One such tool is the inbox filter. While filters can greatly enhance your email management, there may come a time when you need to delete an existing filter. This comprehensive guide will walk you through the process of deleting an inbox filter in Gmail, alongside valuable tips and insights to optimize your email experience.
Understanding Inbox Filters
Before diving into the deletion process, it’s essential to understand what inbox filters are. Filters in Gmail automatically sort incoming emails based on specified criteria, such as sender, subject, or keywords. This organization can save time and help maintain an uncluttered inbox.
How Filters Work
When you create a filter, Gmail applies the set rules to incoming emails, directing them to specific folders or labeling them accordingly. For example:
- Emails from a specific sender can be labeled as “Work”
- Messages containing certain keywords can be archived automatically
Why Delete Filters?
There are several reasons why you might want to delete a filter:
- Change in Email Strategy: Your email management needs may evolve, requiring a change in how you handle incoming messages.
- Redundant Filters: You may find that some filters overlap or create confusion.
- Incorrect Setup: Initially set filters may not work as intended, warranting their removal.
Step-by-Step Guide to Deleting Filters
Follow these simple steps to delete an inbox filter in Gmail:
Step 1: Access Gmail Settings
- Open your Gmail account in a web browser.
- Click on the gear icon in the upper right corner.
- Select “See all settings” from the dropdown menu.
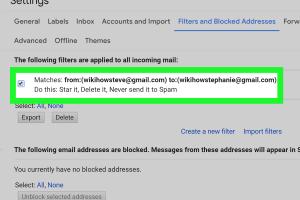
Step 2: Navigate to Filters and Blocked Addresses
- In the settings menu, locate and click on the “Filters and Blocked Addresses” tab.
- You will see a list of all your filters here.
Step 3: Identify the Filter to Delete
- Browse through the list to find the filter you wish to delete.
- Click on “delete” next to the corresponding filter.
Step 4: Confirm Deletion
- A confirmation prompt will appear. Click “OK” to delete the filter permanently.
Case Studies: Real-World Examples
Understanding the impact of filters can be enhanced through real-world examples. Here are a few scenarios:
Case Study 1: Redundant Filters
Jane, a marketing manager, initially created filters to categorize emails by project. However, she found that some filters were overlapping. After reviewing her filters, she deleted redundant ones, streamlining her email process.
Case Study 2: Incorrect Setup
John, a freelancer, set up a filter to archive all emails from a particular client. Unfortunately, he missed important updates. By deleting this filter, he ensured that all messages remained in his inbox until he reviewed them.
Expert Insights on Email Management
Experts recommend regularly reviewing your email filters to ensure they align with your current workflow. This proactive approach can prevent email overload and enhance productivity.
Statistical Data on Email Management
According to a study by the Radicati Group, the average office worker receives around 121 emails per day, making effective email management essential.
Common Mistakes When Managing Filters
When deleting filters, users often make a few common mistakes:
- Not Reviewing Filters Regularly: Failing to review filters can lead to confusion and missed emails.
- Deleting Important Filters: Always double-check the impact of a filter before deletion.
FAQs
1. Can I recover deleted filters in Gmail?
No, once a filter is deleted, it cannot be recovered.
2. Will deleting a filter delete the emails associated with it?
No, deleting a filter will only remove the sorting rules; it won’t delete any emails.
3. How do I create a new filter after deleting one?
Navigate to the “Filters and Blocked Addresses” tab and click on “Create a new filter” to set up a new rule.
4. Can I pause a filter instead of deleting it?
Gmail does not have a pause feature, but you can modify filters to limit their application.
5. Are filters the same as labels?
Filters are rules that automate email sorting, while labels are tags you can manually apply to emails.
6. Can I delete multiple filters at once?
No, you can only delete filters one at a time in Gmail.
7. What happens if I delete a filter by mistake?
You will need to recreate the filter from scratch, as deletion is permanent.
8. Are there limits to the number of filters I can create?
Gmail allows up to 20 filters per account.
9. Can I share filters with other Gmail users?
No, filters are specific to your account and cannot be shared.
10. How can I optimize my filters for better email management?
Regularly review, adjust criteria based on your needs, and combine filters to reduce redundancy.
Conclusion
Managing your inbox effectively is vital in today's fast-paced digital world. Understanding how to delete filters in Gmail is an essential skill that empowers you to maintain a streamlined email environment. By following this guide, you can enhance your email experience, ensuring that your inbox remains organized and efficient.
Random Reads
- How to install arabic language android
- How to make a phone call
- How to make a grindstone in minecraft
- How to change dlink wireless password
- Simple ways to get youtube premium for free
- How to insert images with html
- How to find drifloon pokemon diamond pearl
- How to build porch steps
- How to build plantation shutters
- How to build a brick fireplace with a chimney in minecraft