Ultimate Guide to Fitting and Installing a Bath Panel: Step-by-Step Tutorial

-
Quick Links:
- Introduction
- Types of Bath Panels
- Tools Required
- Preparation Steps
- Fitting the Bath Panel
- Common Issues and Solutions
- Expert Insights
- Case Studies
- Conclusion
- FAQs
Introduction
Fitting and installing a bath panel may seem daunting, but with the right tools and guidance, it can be a straightforward DIY project. In this comprehensive guide, we will walk you through every step of the process, from understanding the different types of bath panels to common issues you might encounter and how to resolve them. Whether you’re a seasoned DIYer or just starting, this guide is designed to help you successfully fit and install a bath panel in your own bathroom.
Types of Bath Panels
Bath panels come in various styles, materials, and designs. Understanding the types available can help you choose the right one for your bathroom:
- Standard Bath Panels: Usually made from acrylic or plastic, these panels are lightweight and easy to clean.
- Wooden Bath Panels: Offering a more traditional look, wooden panels can be painted or stained to match your decor.
- Glass Bath Panels: These panels provide a modern aesthetic and can make your bathroom appear larger.
- Custom Bath Panels: Tailored to fit specific dimensions and styles, these panels often require professional installation.
Tools Required
Before you begin fitting your bath panel, ensure you have the following tools at hand:
- Measuring tape
- Level
- Drill and drill bits
- Screwdriver
- Silicone sealant
- Clamps
- Utility knife
- Safety goggles
Preparation Steps
Proper preparation is crucial for a successful installation. Follow these steps:
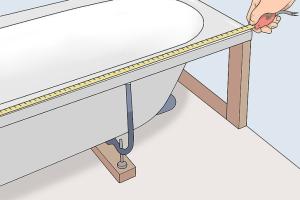
- Measure the Bath: Measure the length of your bath to determine the size of the panel needed.
- Select Your Panel: Choose a bath panel that matches your style and fits correctly.
- Gather Tools: Ensure all tools and materials are ready before starting the installation.
Fitting the Bath Panel
Now that you are prepared, follow these detailed steps to fit your bath panel:
- Position the Bath Panel: Place the panel against the bath, ensuring it fits snugly.
- Mark Drill Points: Use a pencil to mark where you will drill holes for screws or brackets.
- Drill Holes: Carefully drill holes at the marked points.
- Attach the Panel: Use screws or brackets to secure the panel in place.
- Seal the Edges: Apply silicone sealant along the edges to prevent water leaks.
Common Issues and Solutions
Even with careful preparation, you may encounter some common issues during your installation:
- Panel Doesn’t Fit: If your panel is too long or short, consider trimming it with a utility knife.
- Loose Panels: Ensure all screws are tightened and consider adding extra support brackets.
- Water Leaks: Check the silicone sealant and reapply if necessary.
Expert Insights
Industry experts recommend taking your time during the installation process. Rushing can lead to mistakes that may require rework. Also, consider the aesthetics of your bathroom—matching colors and styles can enhance the overall look.
Case Studies
In a recent survey conducted by DIY Home Improvement Magazine, 85% of homeowners that installed bath panels themselves reported satisfaction with the results. Many noted that proper measurements and preparation were key to their success.
Conclusion
Fitting and installing a bath panel is a manageable DIY task that can enhance your bathroom's appearance. With the right tools, preparation, and understanding of the process, you can achieve professional-looking results. Don't hesitate to reach out to professionals if you encounter significant challenges.
FAQs
- How do I choose the right bath panel? Consider your bathroom's style, the material you prefer, and the dimensions needed.
- Can I install a bath panel without professional help? Yes, with the right tools and guidance, many people successfully complete this task themselves.
- How do I fix a loose bath panel? Check all screws for tightness and consider adding additional support if needed.
- What should I do if there are gaps between the panel and bath? Use silicone sealant to fill any gaps to prevent water leaks.
- Are glass bath panels safe? Yes, as long as they are properly installed and made of tempered glass.
- How do I clean my bath panel? Regularly wipe it down with a mild soap solution to prevent buildup.
- Can I paint my wooden bath panel? Yes, painting or staining wooden panels is a great way to customize their look.
- What are the costs involved in fitting a bath panel? Costs can vary based on materials and whether you hire a professional.
- How long does it take to install a bath panel? Typically, it takes 1-3 hours depending on your experience and the complexity of the installation.
- Can I remove and reinstall my bath panel? Yes, bath panels can be removed and reinstalled if necessary.
Random Reads
- How to shut down or restart another computer using cmd
- How to hack screen time
- How to grout a tile floor
- What to do if youve spilled water on your laptop
- How to type gps coordinates into google maps
- How to delete all emails in your gmail inbox at once
- Stop ads youtube
- Simple ways to open a terminal in ubuntu
- How to change your roblox avatar
- How to change your wallpaper on google chrome