This article includes detailed information to fix ERROR CODE 0X8007001F Windows Update Error. This issue mostly appears on screen while updating Windows 10, and leads to non functioning of Bluetooth and Sound. let’s learn to fix the issue.
What Is ERROR CODE 0X8007001F Windows Update Error?
“0x8007001f” is a n error associated with Windows 10 update. This hexadecimal error code usually occurs during Window update installation that prevents you from installing the latest updates. There are several reasons behind this problem including faculty third-party applications, problematic System drivers, malware or viruses issue, corrupted Windows update component during installation, and outdated security programs.
Windows 10 Update Error 0x8007001f indicates the lack of Bluetooth connectivity and lack of sound. Usually, this error occurs due to problematic audio/sound driver and/or compatibility issue between Windows 10 OS and your computer’s hardware.
“Windows 10 updates” are excellent ways by which Microsoft tries to fix several known issues, adds new features to their Windows Operating System. With Windows updates, Microsoft also updates Windows some much needed security improvements and performance boosts. On Windows 10, you can easily check for latest Windows update in “Settings” App and it will be easy to download/install update if available with just few clicks.
But in case if you are facing some error like “Error Code 0x8007001f” while downloading/installing Windows 10 update in your PC, and then it is sure that something went wrong with your computer. As mentioned, this error might occur due to problematic audio drivers that prevent you from updating your device. In this case, you need to uninstall and reinstall audio drivers and/or update it to fix the issue.
Issues Associated With Windows Update ERROR CODE 0X8007001F
- Windows 10 update Assistant Error 0x8007001f: This error occurs due to some problem with your System drivers. You can fix this issue by updating drivers before attempting to update Windows.
- Windows didn’t download the subsequent update with error 0x8007001f: Problematic third-party applications installed in your computer can trigger several errors like 0x8007001f that block you from updating your Windows Operating System.
- Update Error Windows 7, 8.1: This update error code ‘0x8007001f’ can also appear on some older visions of Windows including Windows 7 and 8.1.
Various Approaches To Fix Windows Update Error Code 0x8007001f
Approach 1: Fix Your Windows Issues Automatically
There might be some internal issues occurred with your Windows OS, and it needs to be identified and fixed, which can also be a hassle if done manually. The reason is, you don’t know actually which section in operating system require to be checked and we highly recommend you to choose an automatic scanner to identify and fix the issue for your system.
Download Automatic Scanner To Fix Windows Issues
Approach 2: Disable Security Applications
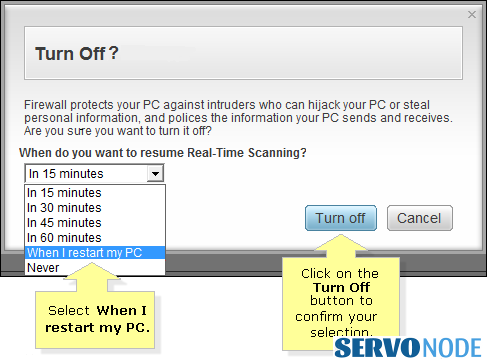
Some antivirus software can cause 0x8007001f error to appear and due enabled antivirus, you can’t perform Windows update operation in this situation. So, you can either remove this error using these tools or disable your antivirus temporarily to fix. But if you are removing these antiviruses, then you should go for other antivirus software as solution for System protection. But before enabling or reinstalling antivirus, Windows update operation must be finished.
Approach 3: Restart Update Services In Windows
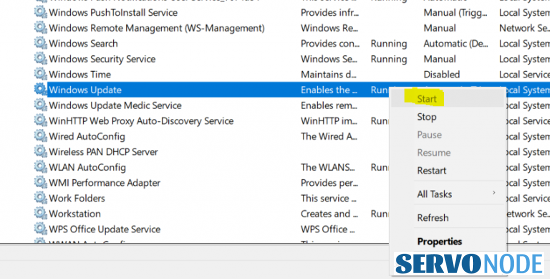
- Press “Windows + R” keys together from keyboard to open “Run Dialog Box”
- Type “services.msc” and hit Enter key or Ok button to open “Services” Window
- Locate “Windows update” service
- Right-click on it and select “Properties”
- Choose “Disabled” from dropdown under “Startup type” section
- Finally, click on “Apply” and “OK” to save the changes and reboot your Windows
- After that, repeat the same step to check out whether Windows update is disabled.
- Now, navigate C:\Windows and locate “SoftwareDistribution” folder
- Rename it to “SoftwareDistribution.OLD”
- Now, repeat ‘step 1 to step 4’ and change “Startup type” from “Disabled” to “Manual”
- Once done, try updating Windows and check if the trouble is resolved.
Approach 4: Reinstall Audio Drivers
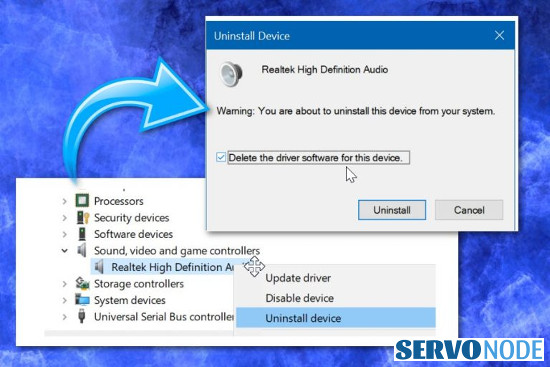
Sometimes, Error Code 0x8007001f can appear due to problematic sound drivers. So, you need to uninstall & reinstall or update sound drivers to fix this issue.
- Press “Windows + X” keys together from keyboard and select “Device Manager” from list
- Locate “Sound, video and game controllers” section, right-click on your audio device and select “Uninstall Device”
- In the confirmation dialog box, check “Remove driver software for this device” and click on “Uninstall” button to start removing driver. After uninstall is finish, restart your computer
- Now, visit your audio device’s manufacturer websites and download the latest drivers and then install it in your computer. Once done, reboot your computer and then check if the problem is resolved. Alternatively, if you are having trouble to know details of your actual audio driver, you can also choose suggested automatic driver updater tool to download and install required driver on your system automatically.
Download Automatic Driver Updater App
Approach 5: Run SFC and DISM Tool
In order to run SFC and DISM tool, we need to run Command Prompt first as an Administrator. once you are ready, follow the instructions here:
To run SFC Scan:
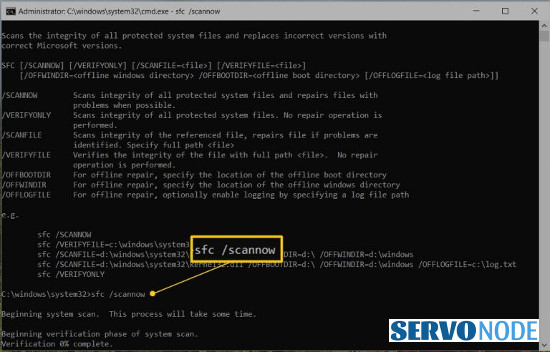
- Press “Windows + X” keys together from keyboard and select “Command Prompt as Administrator”
- Type “sfc/scannow” command and hit “Enter” key to execute
To run DISM Scan:
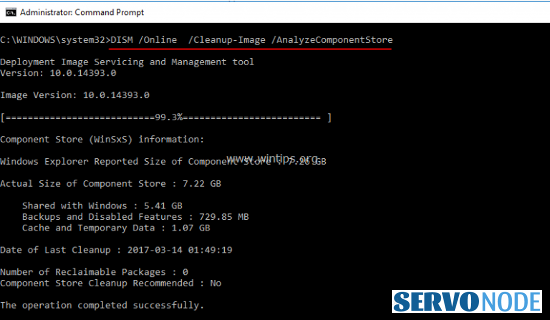
- Open “Command Prompt as Administrator”
- Type “DISM.exe /Online /Cleanup-image /Restorehealth” command in command prompt and hit “Enter” key to execute
- If the service has some problems connecting with Windows update, then you can use USB/DVD System driver by just inserting media and run “DISM.exe /Online /Cleanup-Image /RestoreHealth /Source:C:Your Repair SourceWindows /LimitAccess” in command prompt
- Make sure that you replaced repair source path with your own.
Approach 6: Run A Clean Boot
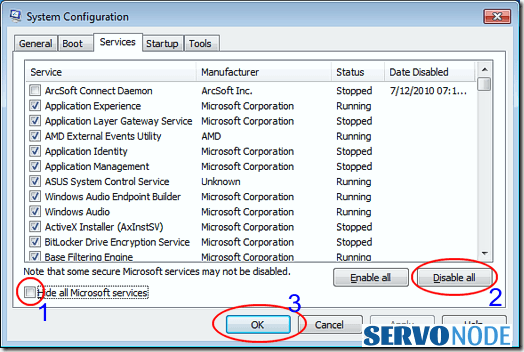
- Press “Windows + R” keys to open “Run Dialog Box”, type “msconfig” and hit “Enter” key
- In the opened “System Configuration” window, click on “Services” tab and check “Hide all Microsoft Services”
- Now, click on “Disable All” button
- After that, click on “Startup” tab in opened “System Configuration” window and click on “Open Task Manager”
- Now, click on “Startup” tab in opened “Task Manager” and right-click on the first item in the list and choose “Disable” from the menu
- Repeat the ‘step 5’ for all the startup items in the list and disable all of them one-by-one.
- After that, go back to “System Configuration” window and click on “Apply” and “OK” button to save the changes
- Finally, restart your computer and check if the trouble is resolved.
Approach 7: Create A New Account
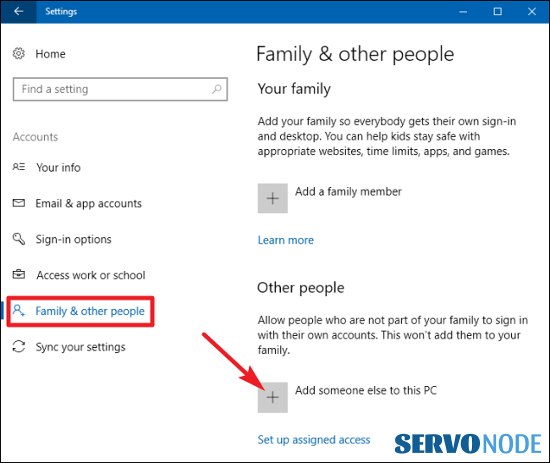
- Press “Windows + I” keys together from keyboard to open “Settings” App
- In the opened “Settings” App, click on “Accounts”
- In left pane, select “Family & other people” and in right pane “Add someone else to this PC”
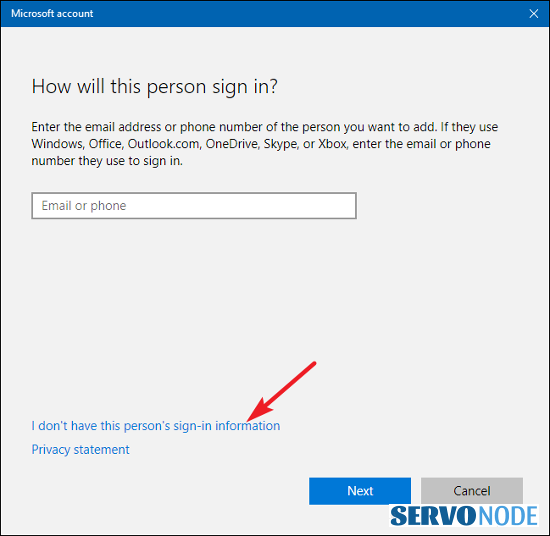
- Now, choose “I don’t have this person’s sign-in information”
- You will be asked to create a Microsoft Account
- Choose “Add a user without a Microsoft Account”
- Now, type desired username in “Who’s going to use this PC” field and type password in password field (Optional) and then click on “Next”
- After that, sign-in with new account and check if the trouble is resolved.
Approach 8: Perform an ‘In-Place Upgrade’
- At first, you need to download “Media Create Tool” from Microsoft official source. To get started, you will first need to have a license to install Windows 10. You can then download and run the media creation tool. For more information, you can visit Microsoft Software download source Official, and download “Media Creation Tool”.
- After download, run it on your PC and select “Upgrade this PC now”
- Wait while the application prepares your System
- Now, choose “Download and Install Updates (Recommended)” and click “Next”
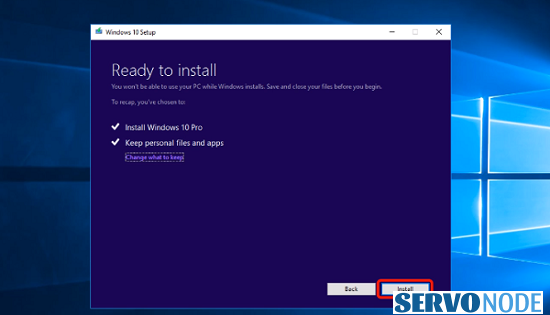
- Follow on-screen instructions until you get to “Read to install” screen. Now, choose “Change what to keep”
- Select “Keep personal files and apps” and click “Next”
- Now, follow on-screen instructions to finish the installation.
- Once done, please check if Windows 10 Update Error 0x8007001f is resolved.
Approach 9: Check For New Windows Updates
- Press “Windows + I” keys together from keyboard to open “Settings” App
- In the opened “Settings” App, click on “Update & Security > Windows update”
- In “Windows Update” section, click on “Check for updates” button. This will automatically download/install the available update for your Windows 10 PC.
- Once updated, restart your PC to save the changes.
Final Words
It’s very common for users to face ERROR CODE 0X8007001F Windows Update Error while updating their Windows operating system, and this may stop some of your computer’s functions. such issues are really irritating and may happen due to various possible reasons. Based on every root cause, we have discussed some of the methods above through which the issue can easily fixed. Do share this tutorial with your friends. If you have any question, you can click to Visit Our Discussion Board.

Nishant Verma is a senior web developer who love to share his knowledge about Linux, SysAdmin, and more other web handlers. Currently, he loves to write as content contributor for ServoNode.