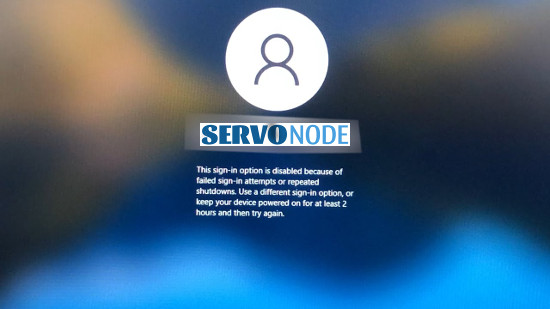
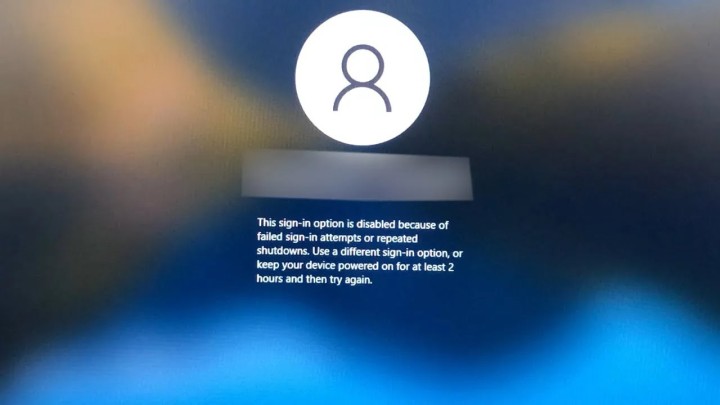
You might have faced “This Sign-in Option is Disabled because of Failed Sign-in Attempts or Repeated Shutdowns” issue sometimes while logging in to Windows 10 PC. This is an error which needs to be resolved immediately to get your computer’s access back.
Let’s see what this issue is and what are the methods to get rid of it.
What is “This Sign-in Option is Disabled because of Failed Sign-in Attempts or Repeated Shutdowns” issue?
This is a simple problem related to Windows Login. It indicates that you cannot login to your desktop because either you entered the wrong PIN several times or someone else has tried to login to it. You may also see this error if your PC shuts down several times. You may get an idea of Windows Password Security from “Account Locked Threshold” setting. It tells about the exact number of times you can try before seeing your account getting locked. And, in order for the user to unlock it, the administrator must reset it.
If we talk about Windows 10, it’s up to you to decide the number of failed attempts and you can set any value between 0 & 999. If this value is set as “0”, you’ll never see your account getting locked out. Crossing this limit means if you try to login with wrong password multiple times, your access to the system will be restricted. Such an issue is called lockdown. The only solution then will be to reset it in order to use it again.
We’ve enlisted a few methods here that will let you know how to fix this issue and how to maintain Windows Password Security.
2. Click Install and Scan Now to find all system issues causing the current problem.
3. Click Fix, Clean & Optimize Now to fix issues affecting your computer’s security and performance.
How to resolve “This Sign-in Option is Disabled because of Failed Sign-in Attempts or Repeated Shutdowns” issue?
Once you notice that your Windows 10 PC isn’t accepting the PIN you’re entering again and again, you can use the following methods:
- Keep the PC turned on for some time
- Use “Admin Account” for unlocking it
- Change “Account Lockout” Policy
1. Keep the PC turned on
When you keep entering the wrong password, Windows thinks it’s someone else who is trying to access your PC and not you. So, it blocks any further access. One of the best ways to tackle this situation is to keep your Windows 10 PC turned on for 2 or 3 hours. Or if you are using a laptop, don’t unplug it. Try to sign in then and you will be able to access it.
This doesn’t seem to be a reliable method because if someone else is trying, he/she will also wait for some time to turn the PC on. But it’s a good option when you (as the owner) can’t access the PC because it will work well for you.
2. Use “Admin Account” to Unlock it
The above-mentioned method will let you wait for no less than two hours to start working. But if you want to unlock the account quickly, you will require one more account which is Admin Account. You can use it with the help of Groups Tool and Local User.
Here is how you can do it:
- First of all, open the “RUN” quickly by typing “Win + R”. After that, type “lusrmgr.msc” before pressing “Enter”.
- In “Local User & Groups” Window, press “Users” and then select the locked user account.
- “Right-click” on it and then press “Properties”.
- Uncheck the checkbox that says, “Account is locked out”. Apply the change then.
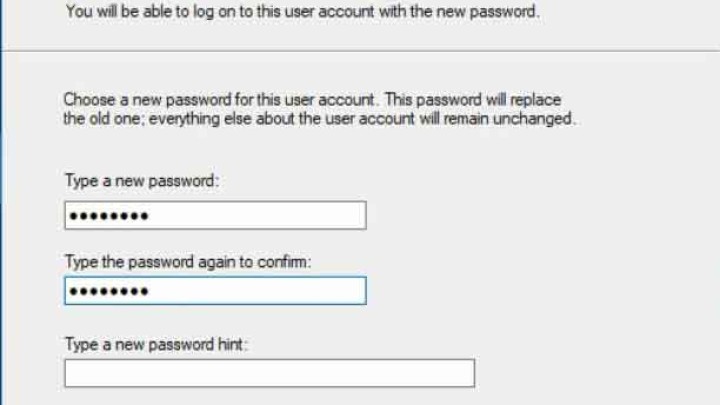
Switching to the “Locked User Account” is mandatory in order for signing in to your account again.
3. Change “Account Lockout” Policy
If you or someone else has access to an “Administration Account”, you will have the option of changing the “Account Lockout” policy. Since the admin can change the policy on current PC, you can use this method for your benefit.
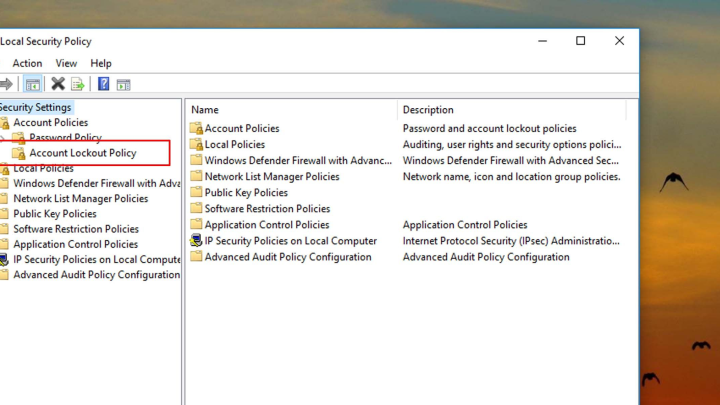
First of all, start with opening “Group Policy Editor”. You need to type “gpedit.msc” in the “RUN (Win + R)” for that. After that, press “Enter”.
From “Computer Configuration”, you can enter “Windows Settings” which will further lead you to “Security Settings”. Once you click on Security Settings, a new tab with “Account Policies” will be opened. From there, you can choose the “Account Lockout Policy”. This is quite easy to navigate using this path. You will see three different policies there:
- Account Lockout Duration
- Reset Account Lockout Counter After
- Account Lockout Threshold
If you see the value of “Lockout Threshold” above zero, you (as an admin) can change it again to zero. It will ensure that you won’t ever be locked out once again. But if you want the lockout feature to stay there, you can set the “Account Lockout Duration” also as the admin. It will ensure that you can access the account even if there is no time left.
The final option will be the amount of time (in minutes) taken between every failed attempt. Configuring an “Account Lockout Threshold” will then be easy. Just restart your PC for applying the change and try to login again.
Is it possible for the Sign-in Options to stop working?
It is quite possible that your sign-in options stop working because of corrupted profile caused by damaged update or incomplete installation. You just need to repair the user profile to fix this issue. And you can use Windows built-in “SFC” scan tool for this purpose.
Also, you may not be able to sign in to Microsoft accounts because of not using the right email or password. Try to remember the correct credentials or contact the customer support team to get the job done.
Conclusion
The issue “This Sign-in Option is Disabled because of Failed Sign-in Attempts or Repeated Shutdowns” may arise because of a number of reasons. And you have multiple options to resolve it, some of them are mentioned above as well. Just figure out the reason correctly and use the relevant method. You will have access to your desktop within some time.

Nishant Verma is a senior web developer who love to share his knowledge about Linux, SysAdmin, and more other web handlers. Currently, he loves to write as content contributor for ServoNode.