Mastering Door Framing: A Step-by-Step Guide to Perfectly Frame Your Door Opening

-
Quick Links:
- 1. Introduction
- 2. Tools and Materials Needed
- 3. Planning and Measurements
- 4. Framing the Door Opening
- 5. Installing the Door Frame
- 6. Finishing Touches
- 7. Case Studies
- 8. Expert Insights
- 9. FAQs
1. Introduction
Framing a door opening is a fundamental skill in carpentry and home improvement. Whether you’re renovating your home or building a new one, understanding how to frame a door opening correctly is crucial for durability and aesthetics. In this comprehensive guide, we’ll delve into everything you need to know about door framing, from tools required to the final touches that will make your door frame stand out.
2. Tools and Materials Needed
Before you begin framing your door opening, gather the necessary tools and materials. Here's a list to get you started:
- Measuring tape
- Level
- Square
- Hammer
- Framing nails or screws
- Wood (2x4s for studs and 2x6s for headers)
- Wood glue
- Safety goggles
- Utility knife
- Drill
3. Planning and Measurements
Accurate planning and measurements are crucial for a successful door framing project. Follow these steps:
- Determine the size of your door. Standard doors are typically 80 inches tall and 36 inches wide.
- Add 2 inches to the height and width for the rough opening. This allows for adjustments and shimming.
- Mark the location of the door opening on the wall where you plan to install it.
4. Framing the Door Opening
Framing the door opening involves creating a sturdy structure that will support the door. Follow these steps:
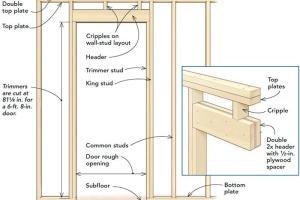
4.1 Building the Header
The header is crucial for supporting the weight above the door. Construct it using two 2x4s sandwiched around a piece of plywood or OSB for added strength.
4.2 Installing the King and Jack Studs
King studs run vertically from the bottom plate to the header, while jack studs support the header. Ensure that they are plumb and secure.
4.3 Adding the Bottom Plate
Use a 2x4 as the bottom plate, ensuring it is level and securely attached to the floor.
5. Installing the Door Frame
Once the door opening is framed, it’s time to install the door frame itself. Here’s how:
- Place the door in the opening and make sure it swings freely.
- Use shims to adjust the frame until it is level and plumb.
- Screw the frame into the studs securely.
6. Finishing Touches
After installing the door frame, add finishing touches such as trim and paint. Here are some tips:
- Select trim that matches your home’s interior style.
- Use caulk to fill any gaps between the trim and wall.
- Paint or stain the door and frame to your preference.
7. Case Studies
Let’s explore some real-world examples of successful door framing projects.
Case Study 1: Renovating a Historic Home
In a recent renovation of a 1920s home, the homeowners decided to replace an outdated door with a modern one. By following proper framing techniques, they preserved the home’s charm while updating its functionality.
Case Study 2: DIY Enthusiasts
A couple took on the challenge of framing a door opening in their basement. With careful planning and execution, they transformed a previously unused space into a functional room.
8. Expert Insights
We consulted with professional carpenters to gather their top tips for framing door openings:
- “Always double-check your measurements before cutting anything.” - Jeff, Master Carpenter
- “Using a level is crucial for a professional finish.” - Sarah, Construction Specialist
- “Don’t rush the process; take your time to ensure accuracy.” - Mike, Building Contractor
9. FAQs
What type of wood is best for framing a door opening?
Softwood like pine is commonly used for framing due to its strength and affordability.
How do I know if my measurements are correct?
Always measure twice and consider using a square to check your angles.
Can I frame a door opening without professional help?
Yes, with the right tools and guidance, DIY enthusiasts can successfully frame a door opening.
What is the rough opening size for a standard door?
The rough opening should be approximately 2 inches taller and wider than the door itself.
How long does it take to frame a door opening?
Depending on your skill level, it can take a few hours to a full day to complete the framing.
Do I need a permit to frame a door opening?
It depends on local building codes. Always check with your local authority.
What tools do I need for framing?
Basic tools include a measuring tape, level, square, hammer, and drill.
How can I ensure my door frame is level?
Use a level during installation and adjust with shims as necessary.
Should I use glue in addition to nails for framing?
Using wood glue in addition to nails can add extra strength to the joints.
What should I do if my door doesn’t fit the opening?
You may need to adjust the frame or the door itself. Always check your measurements before cutting.
Can I frame a door opening in a load-bearing wall?
Yes, but extra care must be taken to ensure proper support. Consult with a structural engineer if unsure.
Where can I find more information on framing techniques?
Websites like the Wood Magazine and the National Association of Home Builders are excellent resources.
Conclusion
Framing a door opening may seem daunting, but with the right tools, materials, and guidance, it can be a rewarding project that enhances your home’s functionality and aesthetics. Remember to take your time, follow the steps outlined in this guide, and soon you'll be able to master this essential carpentry skill.
External References
- Wood Magazine: Wood Basics
- National Association of Home Builders: Industry Issues
- Homes.com: 10 Tips for Framing Door Openings
Random Reads