Step-by-Step Guide: How to Install a Floating Floor Like a Pro

-
Quick Links:
- Introduction
- What Is a Floating Floor?
- Benefits of Floating Floors
- Tools and Materials Needed
- Preparation Steps
- Installation Process
- Post-Installation Care
- Common Mistakes to Avoid
- Case Studies
- FAQs
Introduction
Installing a floating floor is a rewarding project that can transform your living space while enhancing your home’s value. Whether you're a first-time DIYer or an experienced renovator, this comprehensive guide will walk you through every step of the installation process.
What Is a Floating Floor?
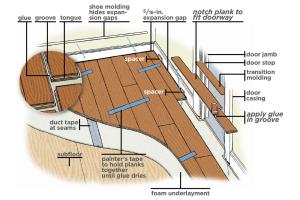
A floating floor is a type of flooring that is not attached to the subfloor. Instead, it "floats" on top of a foam underlayment that provides cushioning and sound absorption. This method allows for easy installation and removal, making it a popular choice for homeowners.
Benefits of Floating Floors
- Easy Installation: Requires minimal tools and no glue or nails.
- Versatile: Suitable for various types of flooring materials, including laminate and vinyl.
- Cost-Effective: Generally less expensive than traditional flooring options.
- Sound Absorption: The underlayment helps reduce noise.
- DIY Friendly: Ideal for those looking to take on a home improvement project.
Tools and Materials Needed
Before starting your floating floor installation, gather the following tools and materials:
- Floating floor planks
- Underlayment
- Measuring tape
- Utility knife
- Straight edge or T-square
- Hammer
- Pull bar
- Spacers
- Safety glasses
- Dust mask
Preparation Steps
Preparation is key to a successful installation. Follow these steps to ensure your space is ready:
- Acclimate the Flooring: Allow the flooring planks to acclimate in the room for at least 48 hours.
- Clean the Subfloor: Remove any debris, dust, or old flooring materials.
- Check for Moisture: Use a moisture meter to ensure the subfloor is dry.
- Install Underlayment: Roll out the underlayment, ensuring seams do not overlap.
Installation Process
Now that your space is prepped, it's time to install the floating floor. Follow these steps:
Step 1: Planning Your Layout
Decide the direction you want your planks to run. Generally, it's best to run them parallel to the longest wall or the main source of light.
Step 2: Starting the Installation
Begin in one corner of the room. Use spacers to maintain a gap between the planks and the wall.
Step 3: Installing the Planks
Connect the planks by angling and clicking them together. Ensure a snug fit, but do not force them.
Step 4: Completing the Room
Continue installing planks across the room, cutting the last plank in each row as necessary. Use a pull bar to secure the last plank in tight spaces.
Step 5: Installing Trim and Transitions
Once the planks are installed, add baseboards or quarter rounds to cover the expansion gap.
Post-Installation Care
To maintain the longevity of your floating floor:
- Regularly sweep or vacuum to remove dirt and debris.
- Use a damp mop for cleaning, avoiding excessive water.
- Consider using furniture pads to prevent scratches.
Common Mistakes to Avoid
Installing a floating floor can be straightforward, but here are common pitfalls to avoid:
- Not acclimating the flooring before installation.
- Ignoring the manufacturer's installation instructions.
- Failing to use spacers for expansion gaps.
- Installing on an uneven subfloor.
Case Studies
Case Study 1: Lisa's Living Room Transformation
Lisa decided to install a floating floor in her living room, opting for a laminate finish. She followed the steps outlined here and transformed her space in just one weekend, saving approximately $1,200 in professional installation costs.
Case Study 2: Mark's DIY Workshop
Mark installed a vinyl floating floor in his workshop. He documented his process, highlighting the ease of installation and the durability of the flooring in high-traffic areas.
FAQs
1. Can I install a floating floor over carpet?
No, it is not recommended to install a floating floor over carpet. The surface should be hard and level.
2. How long does it take to install a floating floor?
The installation time can vary based on the area size, but most homeowners can complete the job in one day.
3. Do I need to glue the planks together?
No, floating floors are designed to click together without glue or nails.
4. What type of underlayment should I use?
Use an underlayment that is compatible with your flooring material, typically foam or felt.
5. Can I install a floating floor in a damp area?
It is not advisable to install floating floors in areas prone to moisture, such as bathrooms or basements, unless specified by the manufacturer.
6. How do I clean my floating floor?
Regular sweeping and occasional damp mopping are recommended. Avoid excessive water exposure.
7. What happens if I don’t leave an expansion gap?
Failure to leave an expansion gap can lead to buckling or warping of the flooring.
8. Can I install underfloor heating with a floating floor?
Some floating floor types are compatible with underfloor heating systems. Check with the manufacturer for specifics.
9. What is the average cost of floating floor installation?
The cost varies based on materials and location, but DIY installations can save significant labor costs.
10. Is a floating floor suitable for pets?
Yes, many floating floor options are durable and scratch-resistant, making them suitable for homes with pets.
Conclusion
Installing a floating floor can dramatically enhance the look and feel of your home while being a manageable DIY project. By following this guide, you can successfully navigate the installation process and enjoy your beautiful new flooring for years to come.
For more information on flooring options and installation tips, visit Home Depot's Guide to Laminate Flooring.
For scientific insights into flooring materials, check out NCBI - A Study on Flooring Materials.
Random Reads