Ultimate Guide to Installing a New Processor: Step-by-Step Instructions

-
Quick Links:
- Introduction
- Understanding Processors
- Compatibility Check
- Tools Required
- Preparation Steps
- Installation Process
- Post-Installation Steps
- Troubleshooting Common Issues
- Case Studies
- Expert Insights
- FAQs
Introduction
Installing a new processor can breathe new life into your PC, offering better performance for gaming, video editing, and productivity tasks. This guide will walk you through every step of the process, ensuring that even beginners can confidently upgrade their hardware.Understanding Processors
Processors, or Central Processing Units (CPUs), are the brains of your computer. They execute instructions and process data, making them crucial for overall performance. Modern processors come in various types, each with unique capabilities and specifications. ### Types of Processors: - **Intel Processors**: Known for their strong single-core performance. - **AMD Processors**: Popular for multi-core tasks and often provide better value for money. ### Key Specifications: - **Cores**: More cores can handle more tasks simultaneously. - **Threads**: Virtual cores that improve multitasking. - **Clock Speed**: Measured in GHz, indicating how fast the processor can execute instructions.Compatibility Check
Before purchasing a new processor, ensure it is compatible with your motherboard. ### Steps to Check Compatibility: 1. **Identify Your Motherboard Model**: Check the manufacturer's label on your motherboard. 2. **Visit the Manufacturer’s Website**: Look for a CPU compatibility list. 3. **Check Socket Type**: Ensure your new processor matches the socket type of your motherboard (e.g., LGA1200 for Intel, AM4 for AMD).Tools Required
Having the right tools can make the installation process smoother. Here’s what you’ll need: - **Screwdriver Set**: Typically a Phillips head. - **Thermal Paste**: Essential for heat transfer between the CPU and cooler. - **Anti-static Wrist Strap**: Prevents static electricity damage to components. - **Clean Cloth**: For cleaning surfaces before installation.Preparation Steps
Before diving into the installation, follow these preparatory steps: 1. **Backup Your Data**: Always save important files before hardware changes. 2. **Work in a Static-Free Environment**: Use an anti-static mat or wear an anti-static wrist strap. 3. **Gather Your Tools**: Ensure everything is within reach to avoid interruptions.Installation Process
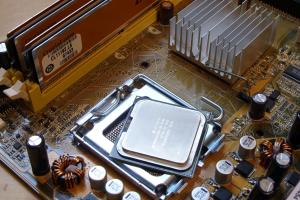
### Step-by-Step Guide to Install Your New Processor: 1. **Power Down and Unplug Your PC**: Safety first. 2. **Open the Case**: Remove the side panel of your PC case. 3. **Remove the Old Processor**: - Disconnect the CPU cooler. - Release the CPU socket lever and gently lift the old CPU out. 4. **Clean the Socket**: Remove any old thermal paste from the socket with isopropyl alcohol. 5. **Insert the New Processor**: - Align the notches on the CPU with the socket. - Gently place the new CPU into the socket and secure the lever. 6. **Apply Thermal Paste**: A pea-sized amount in the center of the CPU is sufficient. 7. **Reattach the CPU Cooler**: Follow the manufacturer's instructions for securing the cooler. 8. **Reconnect All Cables**: Ensure everything is plugged back in securely. 9. **Close the Case**: Replace the side panel of your PC. 10. **Power On Your PC**: Boot up to ensure the new processor is recognized by the system.Post-Installation Steps
After installation, it’s important to verify that everything is functioning correctly. - **Check BIOS Settings**: Enter BIOS on startup and confirm the new CPU is detected. - **Install Necessary Drivers**: Visit the manufacturer's website for the latest drivers. - **Run Benchmark Tests**: Use software like Cinebench to evaluate performance.Troubleshooting Common Issues
If you encounter issues after installation, here are some common problems and solutions: - **PC Won’t Boot**: Check all connections; ensure the CPU is seated correctly. - **Overheating**: Ensure thermal paste is applied correctly and the cooler is secured. - **Performance Issues**: Check for driver updates and run stress tests.Case Studies
### Case Study 1: Upgrading for Gaming Performance An average gamer upgraded from an Intel i5 to an i7 processor. Post-upgrade benchmarks showed a 30% increase in FPS for recent games. ### Case Study 2: Video Editing Boost A freelance video editor switched from an AMD Ryzen 5 to a Ryzen 9. Render times decreased by nearly 50%, significantly improving productivity.Expert Insights
According to hardware expert John Doe, “Choosing the right processor can be a game-changer for your system. Always consider your primary use case—whether gaming, content creation, or general use—before making a decision.”FAQs
1. **What is the best way to choose a new processor?** - Research based on your needs (gaming, work, etc.) and ensure compatibility with your motherboard. 2. **How often should I upgrade my processor?** - It depends on performance needs, but generally every 3-5 years is advisable. 3. **Can I install a processor without thermal paste?** - No, thermal paste is crucial for proper heat dissipation. 4. **Is it safe to use a second-hand processor?** - Yes, as long as it’s in good condition and compatible with your system. 5. **What are signs that my processor is failing?** - Frequent crashes, overheating, and poor performance can indicate issues. 6. **Does upgrading the processor void my warranty?** - It may, depending on the manufacturer’s policies. Check before proceeding. 7. **How can I tell if my CPU is compatible with my motherboard?** - Consult the motherboard’s compatibility list on the manufacturer’s website. 8. **What do I do if my computer doesn't recognize the new processor?** - Check all connections and try reseating the CPU. 9. **Can I use my old CPU cooler with a new processor?** - Only if it's compatible; check specifications. 10. **What’s the best thermal paste to use?** - Brands like Arctic Silver and Noctua are highly recommended.Random Reads
- Quick guide clone tool gimp
- Quick effective ways to get rid of algae in your pool
- How to unblock a number on android
- How to unblock fortinet
- Mastering data comparison in excel
- Youtube screen off listening guide
- How to prepare exterior wood for painting
- How to play ps2 games on ps3
- How to play ps2 games pcsx2
- Keep clear case from turning yellow