Step-by-Step Guide: How to Install Sill Plates for a Strong Foundation

-
Quick Links:
- Introduction
- What are Sill Plates?
- Importance of Sill Plates
- Materials Needed
- Tools Required
- Pre-Installation Steps
- Step-by-Step Installation Guide
- Case Study: Successful Sill Plate Installation
- Common Mistakes to Avoid
- Expert Insights
- FAQs
Introduction
Installing sill plates is a crucial step in constructing a solid foundation for any building. Sill plates serve as the base for your structure, anchoring it to the foundation and providing stability. In this comprehensive guide, we will explore everything you need to know about installing sill plates, from the materials required to the step-by-step installation process. Whether you are a seasoned DIY enthusiast or a first-time builder, this guide is designed to help you achieve a successful installation.
What are Sill Plates?
Sill plates, also known as base plates, are horizontal wooden boards placed on top of a foundation wall, serving as the anchor for vertical wall frames in a building. They are typically made from pressure-treated lumber to resist moisture and decay.
Importance of Sill Plates
Understanding the significance of sill plates is essential for any construction project:
- Structural Support: Sill plates provide the necessary support for the entire structure.
- Moisture Resistance: They help prevent moisture from seeping into the wooden framework.
- Anchoring: Sill plates anchor the building to the foundation, preventing movement during high winds or seismic activity.
Materials Needed
Here’s a list of materials you will need for installing sill plates:
- Pressure-treated lumber (sill plates)
- Concrete anchor bolts
- Wood screws
- Sealant
- Moisture barrier (optional)
Tools Required
The following tools are necessary for installing sill plates:
- Drill with a masonry bit
- Hammer
- Measuring tape
- Level
- Square
- Saw (circular or miter)
- Wrench
Pre-Installation Steps
Before you begin the installation, follow these pre-installation steps:
- Check Local Building Codes: Ensure compliance with local regulations regarding sill plate installation.
- Select the Right Materials: Choose high-quality, pressure-treated lumber for durability.
- Prepare the Foundation: Ensure the foundation is clean and dry.
Step-by-Step Installation Guide
Now that you’re prepared, follow these steps to install your sill plates:
Step 1: Measure and Cut the Sill Plates
Measure the length of the foundation and cut the sill plates to fit accurately. Use a level to ensure they are straight.
Step 2: Position the Sill Plates
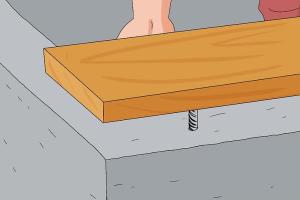
Place the sill plates on the foundation, ensuring they are aligned and level.
Step 3: Drill Holes for Anchor Bolts
Using a drill with a masonry bit, create holes in the sill plates for the anchor bolts, spacing them according to local building codes.
Step 4: Install Anchor Bolts
Insert anchor bolts into the holes and secure them tightly to the foundation.
Step 5: Secure the Sill Plates
Using wood screws, secure the sill plates to the anchor bolts, ensuring they are firmly fastened.
Step 6: Apply Sealant
To prevent moisture infiltration, apply sealant around the edges of the sill plates.
Step 7: Final Check
Double-check that everything is level and secured before proceeding with the wall framing.
Case Study: Successful Sill Plate Installation
In a recent residential project, a homeowner successfully installed sill plates with the above method. The project was completed in a day and resulted in a well-anchored structure that could withstand local weather conditions. The homeowner reported a significant reduction in moisture issues in the basement area.
Common Mistakes to Avoid
Here are some common mistakes to watch out for:
- Not using pressure-treated lumber.
- Failing to check for level before securing the plates.
- Using inadequate spacing for anchor bolts.
Expert Insights
According to experts in the construction field, ensuring proper installation of sill plates is vital for the longevity of any structure. Regular inspections are recommended to identify any issues early on.
FAQs
1. What is the purpose of a sill plate?
A sill plate anchors the structure to the foundation and provides a base for vertical wall framing.
2. How do I choose the right material for sill plates?
Opt for pressure-treated lumber to resist moisture and decay.
3. What tools do I need for installation?
You will need a drill, hammer, measuring tape, level, square, saw, and wrench.
4. How long should sill plates last?
With proper installation and maintenance, sill plates can last for decades.
5. Can I install sill plates myself?
Yes, with the right tools and instructions, a DIY installation is possible.
6. What are the common mistakes during installation?
Common mistakes include not checking for level and using inadequate spacing for anchor bolts.
7. Do I need a permit to install sill plates?
Check with your local building department to determine if a permit is required.
8. How do I prevent moisture issues?
Use pressure-treated wood and apply sealant around the edges of the sill plates.
9. What if my foundation is uneven?
You may need to level the foundation or use shims to ensure the sill plates are level.
10. How often should I inspect my sill plates?
Regular inspections are recommended, especially after severe weather.
References
For further reading, check these authoritative sources:
- Building Science Corporation - Guides
- National Association of Home Builders - Building Your Home
- FEMA - Home Builder's Guide
- CDC - Healthy Homes
Random Reads
- Prevent metals from corroding
- How to turn off your android phone without power button
- How to remove efflorescence from brick
- How to quickly delete a walmart account
- How to put your ipod or iphone into dfu mode
- How to reboot from command prompt windows
- How to pick a sentry safe lock
- How to pick unique secure username
- Opening dicom file free viewers photoshop
- How to play vob files