Ultimate Guide on How to Install a Storm Door for Beginners

-
Quick Links:
- Introduction
- Benefits of Installing a Storm Door
- Essential Tools and Materials
- How to Measure for Your Storm Door
- Step-by-Step Installation Guide
- Maintaining Your Storm Door
- Case Studies and Examples
- Expert Insights
- FAQs
Introduction
Installing a storm door can significantly enhance your home’s energy efficiency, protect your main door, and provide added security. This guide will walk you through the entire installation process, ensuring you have all the knowledge and tools needed for a successful project.
Benefits of Installing a Storm Door
Storm doors offer a range of benefits, including:
- Energy Efficiency: They help keep warm air in during winters and cool air in during summers.
- Protection: Protects your main door from harsh weather elements.
- Increased Security: Adds an additional layer of security to your home.
- Enhanced Curb Appeal: Available in various designs to match your home’s style.
Essential Tools and Materials
Tools You Will Need
- Measuring tape
- Drill
- Screwdriver
- Level
- Utility knife
- Safety goggles
- Hammer
Materials Required
- Storm door kit
- Screws and anchors (usually included in the kit)
- Weather stripping (if not included)
How to Measure for Your Storm Door
Accurate measurements are critical for the successful installation of a storm door. Here’s how to do it:
- Measure the height of your door frame from the top of the threshold to the underside of the top frame.
- Measure the width of your door frame at the top, middle, and bottom.
- Record the smallest width and height measurement to ensure a proper fit.
Step-by-Step Installation Guide
Follow these steps to install your storm door:
Step 1: Prepare the Door Frame
Clean the door frame and remove any old door hardware. Ensure the frame is level and in good condition.
Step 2: Assemble the Storm Door
Follow the manufacturer's instructions to assemble the storm door. Ensure all parts are included and in good condition.
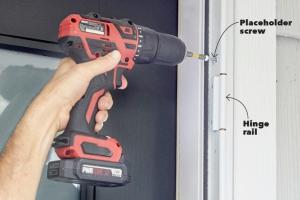
Step 3: Attach the Hinges
Using a drill, attach the hinges to the door and then to the door frame. Make sure the door swings smoothly.
Step 4: Install the Handle and Lock
Position the handle and lock according to the manufacturer’s instructions. Secure them firmly.
Step 5: Adjust the Door
Use a level to ensure the door is straight. Adjust the hinges if necessary for a perfect fit.
Step 6: Secure the Weather Stripping
Apply weather stripping around the edges of the door to enhance insulation and energy efficiency.
Maintaining Your Storm Door
Regular maintenance will prolong the lifespan of your storm door. Here are some tips:
- Check and replace weather stripping regularly.
- Clean the door with mild soap and water.
- Inspect hinges and locks for wear and rust.
- Paint or refinish the door as needed to protect against the elements.
Case Studies and Examples
Consider the case of the Jones family, who installed a storm door in their home last winter. They reported a significant reduction in their heating bills, attributing the savings to the improved insulation provided by the storm door.
Another example is the Smiths, who chose a decorative storm door to enhance their home’s curb appeal while also providing security. They noted that the installation process was straightforward and took only a few hours.
Expert Insights
According to home improvement expert Jane Doe, “Installing a storm door is one of the most effective ways to improve energy efficiency in your home. With the right tools and a bit of patience, anyone can do it!”
FAQs
1. What is a storm door?
A storm door is a secondary door installed outside the main entry door to provide additional protection from the elements.
2. Can I install a storm door by myself?
Yes, with the right tools and guidance, most homeowners can install a storm door themselves.
3. How long does it take to install a storm door?
The installation process typically takes between 2 to 4 hours, depending on your level of experience.
4. Do storm doors come in different sizes?
Yes, storm doors come in various sizes to accommodate different door frames. Be sure to measure your frame before purchasing.
5. What materials are storm doors made from?
Storm doors can be made from aluminum, fiberglass, or wood, each offering different benefits and aesthetic options.
6. Are storm doors energy efficient?
Yes, storm doors can significantly improve your home’s energy efficiency by providing an extra layer of insulation.
7. Can I paint my storm door?
Yes, if your storm door is made from wood, you can paint it. For metal doors, use a paint that is suitable for metal surfaces.
8. What type of storm door should I choose?
Your choice should depend on your needs, such as insulation, security, and aesthetics. Research different styles and materials.
9. How do I maintain my storm door?
Regular cleaning, checking for wear on weather stripping, and repainting or refinishing as needed will maintain your storm door.
10. Where can I buy a storm door?
Storm doors are available at most home improvement stores, online retailers, and specialty door manufacturers.
Conclusion
Installing a storm door is a practical investment for any homeowner. By following the steps outlined in this guide and understanding the benefits, you can enhance your home's efficiency, security, and aesthetic appeal. Happy DIYing!