Ultimate Guide to Laying Slabs: Step-by-Step for Perfect Results

-
Quick Links:
- Introduction
- Tools and Materials Required
- Planning Your Layout
- Preparing the Ground
- Mixing Concrete for Slabs
- Step-by-Step Guide to Laying Slabs
- Finishing Touches
- Maintenance Tips for Your Slabs
- Case Studies and Examples
- FAQs
Introduction
Laying slabs is an essential skill for any DIY enthusiast or homeowner looking to enhance their outdoor space. Whether you want to create a beautiful patio, a robust pathway, or a stylish outdoor sitting area, knowing how to lay slabs correctly can make all the difference. This comprehensive guide will take you through every step of the process, from planning to finishing touches, ensuring you achieve the best results.
Tools and Materials Required
Essential Tools
- Shovel
- Level
- Rubber mallet
- Trowel
- Concrete mixer (or mixing tools if mixing by hand)
- Measuring tape
- String line and stakes
- Safety gear (gloves, goggles)
Materials Needed
- Paving slabs
- Concrete mix (or sand and cement mix)
- Gravel (for the base layer)
- Sand (for leveling)
- Water
Planning Your Layout
Before you start laying slabs, it’s crucial to plan your layout. Consider the following:
- Define the area: Use string lines and stakes to mark the area where the slabs will be laid.
- Design your pattern: Decide on a pattern that suits your space, whether it’s straight-laying, herringbone, or random.
Preparing the Ground
The success of your slab laying project relies heavily on the preparation of the ground. Follow these steps:
- Clear the area: Remove any grass, plants, or debris.
- Excavate: Dig out the soil to a depth of about 150mm, ensuring a level base.
- Create a base: Fill the excavated area with gravel and compact it thoroughly.
- Leveling sand: Add a layer of sand on top of the gravel to create a smooth surface for your slabs.
Mixing Concrete for Slabs
If you’re using concrete for your slabs, it’s essential to mix it correctly. Here’s how:
- Use a concrete mixer or mix by hand in a wheelbarrow.
- Combine cement, sand, gravel, and water in the correct proportions (usually 1:2:3 for a standard mix).
- Mix until you achieve a consistent, workable texture.
Step-by-Step Guide to Laying Slabs
Now that you have everything prepared, it’s time to lay the slabs. Follow these steps:
- Start in a corner: Begin laying your slabs from one corner of the area, working your way out.
- Set the first slab: Place the first slab onto the sand bed, making sure it’s level.
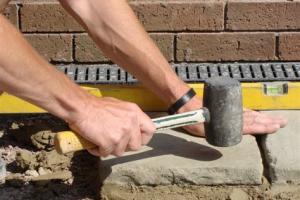
- Use a rubber mallet: Gently tap the slab into place to ensure it’s secure and level.
- Continue laying slabs: Repeat the process for each slab, leaving a gap for grout or jointing material.
- Check levels: Regularly check that the slabs are level and aligned with your planned layout.
Finishing Touches
Once all the slabs are laid, it’s time to finish your project:
- Jointing: Fill the gaps between the slabs with sand or a suitable jointing compound.
- Clean up: Remove any excess material and clean the slabs.
- Sealing: Consider sealing your slabs to protect them from weather and stains.
Maintenance Tips for Your Slabs
To ensure the longevity of your slabs, regular maintenance is key:
- Remove debris regularly.
- Wash the slabs with soapy water and a stiff broom.
- Check for cracks and repair them promptly.
- Reseal the slabs every couple of years if sealed.
Case Studies and Examples
Let’s explore some real-world examples of successful slab laying projects:
Case Study 1: Residential Patio
A homeowner decided to enhance their backyard with a new patio. They followed the steps outlined in this guide, resulting in a beautiful, functional outdoor space. They reported a 50% increase in outdoor usage after completion.
Case Study 2: Commercial Pathway
A local business needed a sturdy pathway for customer access. By using durable paving slabs and proper installation techniques, they achieved a long-lasting solution and received positive feedback from customers.
FAQs
1. How deep should I dig for laying slabs?
You should dig about 150mm (6 inches) deep to allow for a gravel base and a sand layer.
2. Can I lay slabs on soil?
It’s not recommended as soil can shift; always prepare a solid base of gravel and sand.
3. How do I ensure the slabs are level?
Use a level as you lay each slab, adjusting as necessary with sand or a rubber mallet.
4. What type of slabs should I use for outdoor areas?
Opt for weather-resistant materials like concrete or natural stone slabs.
5. How long does it take for concrete to set?
Concrete typically takes about 24-48 hours to set, but full curing can take up to a month.
6. Can I lay slabs in winter?
It’s best to avoid laying slabs in freezing temperatures as it can affect the curing process.
7. What type of jointing material is best?
Sand is a common choice, but there are also commercial jointing compounds available.
8. How do I clean my slabs?
Use a stiff broom and soapy water to remove dirt and debris.
9. Do I need a permit to lay slabs?
This depends on local regulations; check with your local council before starting.
10. Can I lay slabs without a professional?
Yes, if you follow this guide carefully, laying slabs can be a DIY project.
Conclusion
Laying slabs is a rewarding DIY project that can significantly enhance your outdoor space. By following the steps outlined in this guide and considering real-world examples, you can achieve professional results without the need for experts. Happy laying!
External References
- Better Homes and Gardens: Paving Stones Patio Ideas
- HGTV: How to Lay a Patio
- Family Handyman: How to Install Pavers
- Lawn & Garden: How to Lay Paving Slabs
- ABC Gardening: How to Lay Paving Slabs
Random Reads