Mastering Your First Caulk Gun: A Comprehensive Guide to Loading and Using with Confidence

-
Quick Links:
- Introduction
- Understanding the Caulk Gun
- Types of Caulk Guns
- How to Load a Caulk Gun
- How to Use a Caulk Gun
- Common Mistakes to Avoid
- Tips for Successful Caulking
- Case Studies
- FAQs
Introduction
Caulking is an essential skill for any homeowner or DIY enthusiast. It can be the difference between a professional-looking finish and a shoddy job. A caulk gun is a simple tool that allows you to apply caulk evenly and effectively. This guide will help you master the art of loading and using a caulk gun, whether you’re sealing gaps around windows, doors, or any other area that needs waterproofing and insulation.
Understanding the Caulk Gun
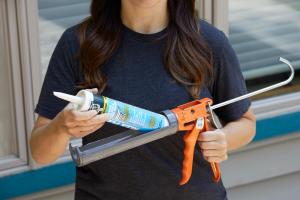
A caulk gun is a tool used to apply caulk, a flexible material that seals joints and gaps in various structures. Understanding how your caulk gun works is the first step towards effective use. Most caulk guns operate with a trigger mechanism that pushes the caulk out of a tube as the trigger is squeezed.
Types of Caulk Guns
There are several types of caulk guns available:
- Manual Caulk Guns: These are the most common. They are easy to use and relatively inexpensive.
- Electric Caulk Guns: These guns use battery or electric power to dispense caulk, making them ideal for large jobs.
- Air-Powered Caulk Guns: Used in professional settings, these require an air compressor and offer a steady flow of caulk.
How to Load a Caulk Gun
Loading your caulk gun correctly is crucial for a smooth application. Follow these steps:
- Choose the Right Caulk: Make sure the caulk you’re using is compatible with your project.
- Prepare the Caulk Tube: Remove the cap and puncture the inner seal if present. You can use a long nail or a special puncturing tool.
- Insert the Caulk Tube: Place the tube into the back of the caulk gun. The nozzle should point forward.
- Secure the Tube: Pull the trigger slightly to engage the plunger, locking the tube in place.
Now your caulk gun is ready to use!
How to Use a Caulk Gun
Using a caulk gun effectively requires technique. Here’s how to do it:
- Choose Your Nozzle Size: Cut the nozzle at a 45-degree angle to the desired size. A larger opening lets more caulk out, while a smaller opening allows for more precision.
- Test the Flow: Squeeze the trigger gently to start the flow of caulk. It’s advisable to practice on a scrap piece of material first.
- Apply the Caulk: Hold the gun at a 45-degree angle and apply steady pressure as you move along the joint. Try to keep a consistent speed.
- Finish the Joint: Smooth out the caulk with a finishing tool or your finger for a neat finish.
Common Mistakes to Avoid
Here are some pitfalls to watch out for:
- Not Puncturing the Seal: Make sure to puncture the inner seal of the caulk tube before loading it into the gun.
- Inconsistent Pressure: Applying too much or too little pressure can lead to uneven application.
- Not Smoothing the Caulk: Always smooth out your caulk for the best finish.
Tips for Successful Caulking
Here are some expert tips:
- Work in sections to avoid the caulk drying before you can smooth it out.
- Keep a damp cloth nearby for cleaning up excess caulk.
- Consider using painter's tape to create clean lines.
Case Studies
In our research, we found multiple instances where homeowners successfully used caulk guns for various projects:
- Case Study 1: A homeowner sealed gaps around windows in a historic house, reducing draft and improving energy efficiency.
- Case Study 2: A DIY enthusiast applied caulk to a bathroom shower to prevent water damage, saving thousands on repairs.
FAQs
1. How do I know which caulk to use?
Choose a caulk that is suitable for your specific materials and environment, such as silicone for bathrooms or acrylic-latex for interior trim.
2. Can I use a caulk gun for adhesive?
Yes, some caulk guns can be used for adhesive products, but ensure that the nozzle is appropriate for the material.
3. What if the caulk hardens in the tube?
Throw away any hardened caulk and clean the gun before loading a new tube.
4. Is it difficult to clean a caulk gun?
It can be challenging, but using a damp cloth and a putty knife can make the process easier.
5. Can I use my caulk gun outdoors?
Yes, as long as you use exterior-grade caulk that can withstand weather conditions.
6. How do I store my caulk gun?
Keep it in a dry place and remove any leftover caulk from the nozzle to prevent hardening.
7. What is the best way to smooth out caulk?
You can use your finger dipped in water or a caulk finishing tool.
8. How long does caulk take to dry?
Drying time can vary, but most caulks need 24 hours to cure completely.
9. Can I paint over caulk?
Yes, ensure the caulk is paintable and let it dry fully before painting.
10. What should I do if my caulk gun leaks?
Check the tube for damage or ensure it’s loaded correctly. If the problem persists, consider replacing the gun.
Random Reads
- How to wire an electric cooker
- How to wire a potentiometer
- How to play angry birds
- How to play as luigi in super mario galaxy
- How to rotate google photos android
- How to reupholster furniture
- How to restore google contacts
- How to indent in word
- How to increase volume computer
- How to remove stains from stainless steel