DIY Honeycomb Shelves: A Step-by-Step Guide to Creating Unique Home Decor

-
Quick Links:
- Introduction
- Materials Needed
- Tools Required
- Designing Your Honeycomb Shelves
- Building the Honeycomb Shelves
- Finishing Touches
- Case Studies and Examples
- Expert Insights
- FAQs
Introduction
Are you looking for a stylish and modern way to display your favorite books, plants, or collectibles? Honeycomb shelves are a fantastic option that not only provides storage but also adds a unique aesthetic to your home decor. In this comprehensive guide, we will walk you through the process of creating your own homemade honeycomb shelves, from planning and design to construction and finishing.
Materials Needed
Before you begin, gather the following materials:
- Plywood or MDF (medium-density fiberboard)
- Wood glue
- Wood screws
- Sandpaper (various grits)
- Paint or wood stain
- Clear wood finish (optional)
Tools Required
For this project, you'll need the following tools:
- Table saw or circular saw
- Drill
- Clamps
- Measuring tape
- Square
- Pencil
Designing Your Honeycomb Shelves
Your first step in making honeycomb shelves is to decide on the design. Honeycomb shelves can come in various shapes and sizes, so consider the following:
- Dimensions: How large do you want your shelves to be?
- Configuration: Will you create a single honeycomb unit or multiple units?
- Placement: Where in your home will these shelves go?
Sketch your design on paper or use design software to visualize how your shelves will look. Remember to include measurements for each section of the honeycomb structure.
Building the Honeycomb Shelves
Step 1: Cutting the Wood
Using your table saw or circular saw, carefully cut your plywood or MDF into hexagonal shapes based on your design. Make sure to measure twice to ensure accuracy.
Step 2: Assembling the Honeycomb Structure
Start by laying out the hexagons in the desired configuration. Use wood glue and clamps to secure each hexagon together. Once the glue has set, reinforce the joints with wood screws for added stability.
Step 3: Sanding the Edges
After the structure is assembled, sand all edges and surfaces with various grits of sandpaper. Start with a rough grit to smooth out the edges, and finish with a finer grit for a polished look.
Step 4: Painting or Staining
Apply your chosen paint or wood stain to the shelves. This is a great opportunity to customize the color to match your home decor. Allow the finish to dry completely before proceeding to the next step.
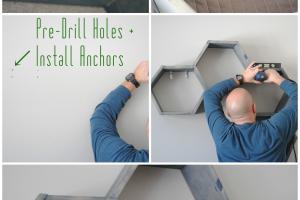
Step 5: Installing the Shelves
Once the shelves are dry, it’s time to install them on the wall. Use wall anchors and screws to ensure they can hold weight. Make sure to use a level to keep everything straight.
Finishing Touches
To enhance the look of your honeycomb shelves, consider adding decorative elements such as:
- Small plants
- Books
- Decorative boxes
- Art pieces
Case Studies and Examples
Many DIY enthusiasts have successfully created their own honeycomb shelves. For example, Sarah from Houston shared her experience of building a honeycomb shelf system for her children's playroom. She used bright colors and added storage bins to make the space functional and fun. You can find her project details on her blog here.
Expert Insights
According to woodworking expert Jim Smith, "The beauty of honeycomb shelves lies in their versatility. They can be tailored to fit any space while providing both style and function." Jim emphasizes the importance of selecting quality materials to ensure durability and longevity.
FAQs
1. What type of wood is best for honeycomb shelves?
Plywood and MDF are popular choices due to their affordability and ease of use.
2. How much weight can honeycomb shelves hold?
The weight capacity depends on the materials used and the installation method. Properly anchored shelves can hold significant weight.
3. Can I paint honeycomb shelves?
Yes, painting is a great way to customize your shelves. Ensure the surface is sanded for better adhesion.
4. Do I need special tools to make honeycomb shelves?
Basic woodworking tools like a saw, drill, and clamps are sufficient for this project.
5. How long does it take to build honeycomb shelves?
The time varies depending on your design and experience level, but you can typically complete the project in a weekend.
6. Can I use honeycomb shelves in a bathroom?
Yes, honeycomb shelves can be used in bathrooms as long as they are sealed properly to prevent moisture damage.
7. What is the best way to install honeycomb shelves?
Using wall anchors and screws ensures stability. Always use a level to keep your shelves straight.
8. Can I customize the size of the honeycomb shelves?
Absolutely! You can adjust the dimensions of each hexagon to fit your space.
9. Are honeycomb shelves easy to disassemble?
Yes, if constructed with screws, they can be easily taken apart.
10. Where can I find inspiration for designing honeycomb shelves?
Online platforms like Pinterest and home decor blogs are excellent sources for inspiration.
Random Reads
- How to test your laptops battery health in windows 10
- How to use imac as external monitor
- How to use imessage
- How to make a network cable
- How to make a parallel circuit
- How to remove dirt and grime from your optical mouse
- How to set up shared network drive
- How to set up private network
- How to transfer contacts from iphone to iphone
- How to save energy in your home