Ultimate Guide to Removing a Shower Head: Step-by-Step Instructions

-
Quick Links:
- Introduction
- Tools Needed
- Steps to Remove a Shower Head
- Troubleshooting Common Issues
- Cleaning Your Shower Head
- Installing a New Shower Head
- Expert Insights
- Case Studies
- FAQs
Introduction
Removing a shower head can seem daunting, but with the right tools and guidance, it's a straightforward task that can enhance your bathroom experience. Whether you're upgrading to a more modern design or just need to clean your existing fixture, this guide will walk you through the entire process. We’ll cover everything from tools needed to common issues you may encounter. Let’s dive in!
Tools Needed
Before you start, gather the following tools:
- Adjustable wrench or pliers
- Electrical tape (optional)
- Bucket or towel (to catch any water)
- Vinegar or cleaning solution (for cleaning)
Steps to Remove a Shower Head
Step 1: Turn Off the Water Supply
Before you begin, make sure to turn off the water supply to your shower. This step is crucial to avoid any unexpected water sprays.
Step 2: Prepare the Area
Place a bucket or towel under the shower head to catch any water that may drip out during the removal process.
Step 3: Loosen the Shower Head
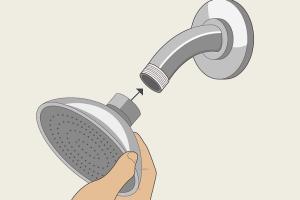
Using an adjustable wrench or pliers, carefully grip the shower head and turn it counterclockwise. If it’s too tight, you may need to apply additional force, but be cautious not to damage the fixture.
Step 4: Remove the Shower Head
Once loosened, you should be able to unscrew the shower head by hand. If there are any washers or gaskets, be sure to remove these as well.
Step 5: Inspect for Damage
After removal, inspect the threads on the shower arm for any damage. If they are stripped or worn, you might need to replace this part before installing a new shower head.
Troubleshooting Common Issues
Stuck Shower Head
If your shower head is stuck and won’t budge, try applying some penetrating oil and let it sit for a few minutes before attempting to remove it again.
Stripped Threads
If the threads on the shower arm are stripped, you may need to use a thread repair kit or replace the arm entirely.
Cleaning Your Shower Head
After removing your shower head, it’s a good time to clean it. Soak it in a solution of vinegar and water to remove mineral buildup.
Installing a New Shower Head
Step 1: Prepare the Arm
Ensure the shower arm is clean and free from debris. If necessary, wrap the threads with Teflon tape to ensure a good seal.
Step 2: Attach the New Shower Head
Align the new shower head with the threads on the shower arm and screw it on by hand. Use the wrench to tighten it slightly, but avoid over-tightening.
Step 3: Turn On the Water Supply
Turn the water supply back on and check for leaks. If you notice any, tighten the shower head slightly.
Expert Insights
According to plumbing expert Jane Doe, "Regular maintenance of your shower fixtures can prevent issues down the line. Make it a habit to clean your shower heads every few months to maintain optimal water flow."
Case Studies
Case Study 1: Upgrading to a Water-Saving Shower Head
A homeowner decided to replace their old shower head with a water-saving model. After removal, they noticed a 30% reduction in water usage, saving money on their water bill while enjoying a revitalizing shower experience.
Case Study 2: Fixing a Leak
A couple discovered that their shower head was leaking, causing water damage in their bathroom. After replacing the shower head, they not only solved the leak but also improved their shower's aesthetics with a modern design.
FAQs
1. How often should I clean my shower head?
It’s recommended to clean your shower head every 3-6 months to prevent mineral buildup.
2. Can I remove a shower head without tools?
In some cases, you may be able to unscrew it by hand, but tools are often necessary for tight fittings.
3. What if I lose a washer during removal?
If you lose a washer, you can find a replacement at any hardware store. Just make sure it matches the size of the old one.
4. How do I know if my shower head is compatible with my shower arm?
Most shower heads are universal, but it’s best to check the specifications of the new shower head before purchase.
5. Is it safe to use vinegar to clean my shower head?
Yes, vinegar is an effective and safe cleaning solution for removing mineral deposits.
6. How can I prevent my shower head from getting stuck?
Regular maintenance and cleaning can help prevent buildup that leads to a stuck shower head.
7. Can I use pliers instead of a wrench?
Yes, pliers can be used, but be cautious to avoid damaging the finish of the shower head.
8. What tools do I need to install a new shower head?
Typically, an adjustable wrench and Teflon tape are sufficient for installation.
9. How long does it take to remove and replace a shower head?
The process usually takes about 15-30 minutes, depending on your experience level.
10. What if I encounter leaks after installation?
If you notice leaks, ensure the shower head is tightened properly and check for any missing washers.
Random Reads