Ultimate Guide: How to Safely & Easily Remove a Ceiling Fan

-
Quick Links:
- Introduction
- Tools Required
- Safety Precautions
- Step-by-Step Guide to Removing a Ceiling Fan
- Common Issues When Removing a Ceiling Fan
- Expert Tips for Ceiling Fan Removal
- Case Studies
- Conclusion
- FAQs
Introduction
Removing a ceiling fan may seem like a daunting task, but with the right tools, safety precautions, and a step-by-step guide, it can be a straightforward process. Whether you're replacing an old fan with a new one or just want to take it down for maintenance, understanding the process is crucial for both safety and efficiency. In this guide, we will walk you through everything you need to know to safely and easily remove a ceiling fan.
Tools Required
Before you begin, make sure you have the following tools on hand:
- Step ladder
- Screwdriver (flathead and Phillips)
- Plier
- Voltage tester
- Wire nuts
- Electrical tape
Safety Precautions
Safety should always be your top priority when working with electrical fixtures. Follow these precautions:
- Turn off the power at the circuit breaker before starting.
- Use a voltage tester to ensure no electricity is flowing to the fan.
- Always use a stable ladder and have someone assist you if needed.
- Wear safety goggles to protect your eyes from falling debris.
Step-by-Step Guide to Removing a Ceiling Fan
Step 1: Turn Off the Power
Before you begin any work, locate your circuit breaker and turn off the power to the ceiling fan. Use the voltage tester to confirm that the power is off.
Step 2: Remove the Fan Blades
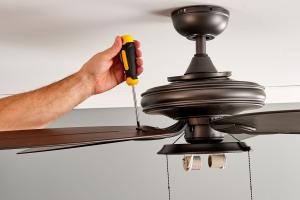
Using a screwdriver, carefully remove the fan blades one at a time. Keep the screws in a safe place for reinstallation if necessary.
Step 3: Disconnect the Light Kit (if applicable)
If your fan has a light kit, remove it by unscrewing it from the fan. Disconnect the wires carefully, making sure to note their configuration.
Step 4: Remove the Fan Motor
Locate the mounting bracket. Unscrew the fan motor from the bracket, and carefully lower it down. Make sure to support the fan motor to prevent it from falling.
Step 5: Disconnect the Wires
Once the fan is free, disconnect the wiring. Typically, you'll find two or three wires connected with wire nuts. Untwist the wire nuts and separate the wires.
Step 6: Remove the Mounting Bracket
Unscrew and remove the mounting bracket that holds the fan to the ceiling. Check for any additional wiring or components that may need to be removed.
Common Issues When Removing a Ceiling Fan
While removing a ceiling fan is generally straightforward, you may encounter some common issues:
- Stuck screws: Use penetrating oil to loosen difficult screws.
- Unexpected wiring: Always consult a professional if you encounter unfamiliar wiring.
- Heavy fans: Get assistance if the fan is too heavy to handle alone.
Expert Tips for Ceiling Fan Removal
Here are some expert tips to make the process smoother:
- Take photos of the wiring configuration before disconnecting.
- Label all wires and screws to avoid confusion during reinstallation.
- Consider replacing any worn-out components while the fan is down.
Case Studies
Understanding real-world scenarios can enhance your confidence in undertaking this task. Here are a few case studies:
Case Study 1: The DIY Challenge
A homeowner decided to remove an old ceiling fan to replace it with a more energy-efficient model. By following the steps outlined above, they successfully removed the fan without any issues.
Case Study 2: Wiring Confusion
Another homeowner faced confusion with multiple wires in the ceiling. After documenting everything with photos and consulting an electrician, they were able to proceed safely.
Conclusion
Removing a ceiling fan can be accomplished safely and easily with the right tools and knowledge. Always prioritize safety, and don’t hesitate to consult professionals if needed. With this guide, you have all the information necessary to tackle this home improvement task confidently.
FAQs
1. How long does it take to remove a ceiling fan?
Typically, it takes about 1-2 hours depending on your experience and the complexity of the fan's installation.
2. Can I remove a ceiling fan without assistance?
While it’s possible to do it alone, having someone to help is recommended, especially for heavy fans.
3. What should I do if I encounter unfamiliar wiring?
It’s best to consult a licensed electrician to ensure safety and compliance with local codes.
4. Is it necessary to turn off the power when removing a ceiling fan?
Yes, always turn off the power to prevent electrical shock.
5. Can I replace a ceiling fan with a light fixture?
Yes, you can replace a fan with a light fixture, but ensure that the electrical box is rated for the weight of the new fixture.
6. How do I dispose of an old ceiling fan?
Check local regulations for disposal. Many components can be recycled, while others may need to go to a landfill.
7. What tools do I need to reinstall a ceiling fan?
You will need similar tools as when removing it: screwdrivers, wire nuts, pliers, and a ladder.
8. Are there any safety certifications I should look for in a new fan?
Look for fans with UL (Underwriters Laboratories) certification to ensure safety and quality.
9. Can I install a ceiling fan on a sloped ceiling?
Yes, there are specially designed mounting kits available for sloped ceilings.
10. What if the ceiling fan is too heavy for me to remove alone?
If the fan is too heavy, it’s advisable to seek help from a friend or hire a professional.