Ultimate Guide to Repairing a Blown Speaker: Step-by-Step Techniques

-
Quick Links:
- Introduction
- Understanding Blown Speakers
- Tools and Materials Needed
- Diagnosing the Issue
- Step-by-Step Repair Process
- Prevention Tips
- Real-World Case Studies
- Expert Insights
- Conclusion
- FAQs
Introduction
Have you ever been enjoying your favorite music only to be interrupted by the dreaded sound of a blown speaker? A blown speaker can be a frustrating experience, but the good news is that many blown speakers can be repaired at home with the right tools and techniques. This comprehensive guide will walk you through everything you need to know about diagnosing and repairing a blown speaker, helping you save money and get back to your music without the need for a costly replacement.
Understanding Blown Speakers
Before diving into repairs, it’s essential to understand what a blown speaker is. A blown speaker usually occurs when the speaker cone is damaged or the voice coil is burned out. This can result from prolonged exposure to high volumes, electrical issues, or physical damage.
- Speaker Cone Damage: The most visible sign of a blown speaker, often characterized by tears or holes.
- Burnt Voice Coil: Symptoms include distortion or complete silence when the speaker is powered.
- Electrical Issues: Faulty connections or power surges can lead to speaker failure.
Tools and Materials Needed
To successfully repair a blown speaker, you’ll need the following tools and materials:
- Multimeter
- Screwdriver set
- Glue (for cone repairs)
- Replacement parts (cone, voice coil, etc.)
- Wire strippers and connectors
- Soft cloth or sponge
- Heat gun or hair dryer (for certain repairs)
Diagnosing the Issue
Correctly diagnosing the problem is crucial before attempting any repairs. Here’s how:
- Visual Inspection: Check for physical damage to the speaker cone and surround.
- Electrical Testing: Use a multimeter to check the resistance of the voice coil. A reading of infinite resistance indicates a blown coil.
- Listen for Symptoms: Play audio through the speaker to identify distortion, crackling, or silence.
Step-by-Step Repair Process
Once you’ve diagnosed the issue, follow these steps to repair the speaker:
1. Removing the Speaker
Carefully remove the speaker from its housing using a screwdriver. Take note of how it’s connected for reassembly.
2. Inspecting Internal Components
Open the speaker enclosure and inspect internal components like the voice coil and magnets. Look for signs of damage.
3. Repairing the Speaker Cone
If the cone is damaged, you can repair it using glue or replace it entirely. For small tears, apply glue along the edges and smooth it out.
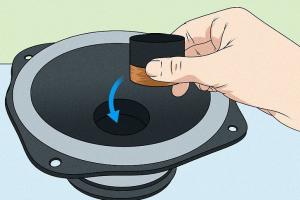
4. Replacing the Voice Coil
If the voice coil is burnt, it will need replacing. Carefully remove it and attach a new one following the manufacturer's guidelines.
5. Reassembly
Reassemble the speaker, ensuring all connections are secure. Replace screws and check for any loose parts.
6. Testing the Repair
Before mounting the speaker back, test it with a multimeter and play audio to ensure it’s functioning correctly.
Prevention Tips
To avoid future speaker issues, consider these tips:
- Limit volume levels to prevent overheating.
- Regularly check wiring and connections.
- Store speakers in a safe environment to prevent physical damage.
Real-World Case Studies
To illustrate the effectiveness of these repair techniques, here are a couple of real-world examples:
Case Study 1: DIY Repair of a Vintage Speaker
In a recent DIY project, a vintage speaker was repaired after a blown voice coil. The owner followed the steps outlined in this guide, successfully replacing the coil and restoring sound quality.
Case Study 2: Cone Repair Success
Another case involved a modern speaker with a torn cone. The owner applied glue and a patch, which resulted in a significant improvement in sound quality, demonstrating that not all damage requires replacement.
Expert Insights
According to audio repair experts, regular maintenance and careful handling of speakers can significantly reduce the likelihood of blowouts. Always ensure your audio equipment is compatible with your speaker’s specifications.
Conclusion
Repairing a blown speaker is not only possible but can also be a rewarding DIY project. With the right tools and techniques, you can bring your speakers back to life without breaking the bank. Remember to follow the steps carefully and take preventive measures to extend the life of your audio equipment.
FAQs
1. Can I repair a blown speaker myself?
Yes, many blown speakers can be repaired using DIY methods if you have the right tools and follow the proper steps.
2. What causes a speaker to blow?
Common causes include prolonged exposure to high volumes, electrical issues, and physical damage to the speaker components.
3. How can I tell if my speaker is blown?
Signs include distortion, crackling sounds, or complete silence when audio is played.
4. Is it worth repairing a blown speaker?
If the speaker has sentimental value or high quality, it’s often worth repairing compared to buying a new one.
5. What tools do I need for speaker repair?
Tools include a multimeter, screwdrivers, glue, and replacement parts like cones or voice coils.
6. How long does speaker repair take?
The time varies based on the issue, but most repairs can be completed in a few hours.
7. Can I use regular glue for speaker repairs?
It’s best to use specific glue designed for audio equipment as it can withstand vibrations and heat.
8. How do I maintain my speakers to prevent blowouts?
Limit volume levels, check connections regularly, and store them safely to avoid damage.
9. What if my speaker still doesn’t work after repair?
If the repair doesn’t work, it may be time to consider professional repairs or replacement.
10. Are there professional services for speaker repair?
Yes, many audio repair shops offer professional services for blown speakers if DIY efforts fail.