Ultimate Guide to Replacing Smoke Detectors: Step-by-Step Instructions

-
Quick Links:
- Importance of Smoke Detectors
- Types of Smoke Detectors
- When to Replace Smoke Detectors
- Tools Needed for Replacement
- Step-by-Step Guide to Replacing Smoke Detectors
- Common Mistakes to Avoid
- Case Studies
- Expert Insights
- FAQs
Importance of Smoke Detectors
Smoke detectors are vital components of fire safety in homes and buildings. They alert occupants to the presence of smoke, allowing them to evacuate and call for help. According to the National Fire Protection Association (NFPA), three out of five home fire deaths occur in homes with no smoke alarms or non-functional alarms. This statistic highlights the critical role of smoke detectors in saving lives.
Types of Smoke Detectors
There are several types of smoke detectors available, each with its own advantages:
- Ionization Smoke Detectors: Best for detecting fast-flaming fires.
- Photoelectric Smoke Detectors: More effective for smoldering fires.
- Dual-Sensor Smoke Detectors: Combine both ionization and photoelectric technologies for comprehensive coverage.
- Smart Smoke Detectors: Can send alerts to your smartphone and integrate with home automation systems.
When to Replace Smoke Detectors
It’s essential to know when to replace your smoke detectors. Here are some key indicators:
- Smoke detector is over 10 years old.
- Unit does not respond to test button.
- Visible damage or wear.
- Persistent chirping, indicating low battery or malfunction.
Tools Needed for Replacement
Before starting the replacement process, gather the following tools:
- New smoke detector (appropriate type)
- Drill and drill bits
- Screwdriver (flathead and Phillips)
- Level
- Measuring tape
- Safety goggles
- Step ladder
Step-by-Step Guide to Replacing Smoke Detectors
Replacing smoke detectors can be a straightforward process. Here’s a detailed step-by-step guide:
Step 1: Remove the Old Smoke Detector
Follow these instructions:
- Turn off the power at the circuit breaker if your smoke detector is hardwired.
- Use a step ladder to reach the smoke detector.
- Twist the detector counterclockwise to remove it from its mounting bracket.
- If hardwired, disconnect the wires carefully.
Step 2: Install the New Smoke Detector
Now, install the new unit:
- Connect the wires (if applicable) by matching the colors (black to black, white to white).
- Secure the new detector to the mounting bracket by twisting it clockwise.
- If the detector runs on batteries, insert the batteries according to the label instructions.
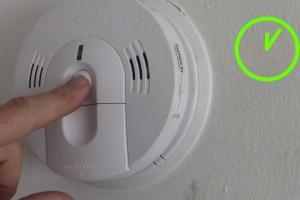
- Test the smoke detector by pressing the test button until you hear a beep.
Step 3: Dispose of the Old Detector
Dispose of the old smoke detector according to local guidelines. If it contains a radioactive ionization chamber, it may require special disposal.
Common Mistakes to Avoid
When replacing smoke detectors, avoid these common pitfalls:
- Ignoring expiration dates.
- Not testing new detectors.
- Failing to read the manufacturer’s installation instructions.
- Installing detectors too close to kitchens or bathrooms, which can cause false alarms.
Case Studies
Understanding real-life applications can help solidify the importance of replacing smoke detectors:
Case Study 1: The Johnson Family
The Johnson family had smoke detectors that were over 15 years old. After a fire in a neighboring home, they decided to replace all their smoke detectors. They installed dual-sensor models, which alerted them to a small kitchen fire just moments after it ignited, allowing them to extinguish it before it spread.
Case Study 2: Community Awareness Program
A community in California launched a smoke detector replacement program after a series of house fires. They provided free installations and discovered that over 50% of the smoke detectors in the homes were non-functional. The initiative resulted in a significant decrease in fire-related incidents within a year.
Expert Insights
According to fire safety experts, regular maintenance of smoke detectors is crucial for effective performance. They recommend:
- Testing smoke detectors monthly.
- Replacing batteries at least once a year.
- Replacing smoke detectors every 10 years, regardless of their condition.
FAQs
- 1. How often should smoke detectors be replaced?
- Smoke detectors should be replaced every 10 years.
- 2. How do I test my smoke detector?
- Press the test button on the smoke detector. It should emit a loud beep.
- 3. Can I install a smoke detector myself?
- Yes, smoke detectors can be installed as a DIY project with basic tools.
- 4. What type of smoke detector is best for my home?
- Dual-sensor smoke detectors are recommended for comprehensive coverage.
- 5. How do I dispose of old smoke detectors?
- Check local regulations for disposal methods, especially for ionization detectors.
- 6. What should I do if my smoke detector goes off for no reason?
- Check for smoke or heat sources; if none are found, it might be a false alarm. Reset the detector and consider replacing it if it continues to malfunction.
- 7. Do smoke detectors need to be hardwired?
- No, there are battery-operated smoke detectors that are effective as well.
- 8. Are smart smoke detectors worth it?
- Yes, smart smoke detectors offer added safety features and remote notifications.
- 9. What is the best placement for smoke detectors?
- Install smoke detectors on every level of your home, inside sleeping areas, and outside sleeping areas.
- 10. How can I ensure my smoke detector is working properly?
- Regularly test and maintain your smoke detector according to the manufacturer’s instructions.
Random Reads