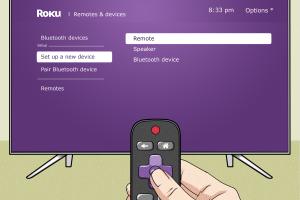
Ultimate Guide: How to Sync a Roku Replacement Remote in Minutes

-
Quick Links:
- 1. Introduction
- 2. Understanding Roku Remotes
- 3. Types of Roku Remotes
- 4. Preparing to Sync Your Remote
- 5. Step-by-Step Syncing Process
- 6. Troubleshooting Tips
- 7. Case Studies
- 8. Expert Insights
- 9. Conclusion
- 10. FAQs
1. Introduction
Roku devices have become a staple in the streaming world, offering a user-friendly interface and access to a plethora of content. However, a common issue that many users face is syncing a replacement remote. Whether your original remote is lost, broken, or simply not functioning, knowing how to sync a new one is essential for uninterrupted entertainment. In this guide, we will explore the steps needed to sync a Roku replacement remote, offering troubleshooting tips, expert insights, and even real-world case studies.
2. Understanding Roku Remotes
Roku remotes serve as the primary control interface for Roku streaming devices. They come in various forms, each designed to meet different user needs. Understanding how these remotes work will help you troubleshoot and sync them effectively.
Key Features of Roku Remotes
- Voice Control: Some models support voice commands for easy navigation.
- Private Listening: This feature allows users to listen to content through headphones plugged into the remote.
- Shortcut Buttons: Most remotes come with dedicated buttons for popular streaming services.
3. Types of Roku Remotes
Roku remotes can be classified into two main categories: standard IR remotes and enhanced remotes.
Standard IR Remotes
These remotes use infrared signals to communicate with the Roku device. They require a direct line of sight and may have limited features.
Enhanced Remotes
Enhanced remotes connect via Wi-Fi and don't need a direct line of sight. They usually come with more features, such as voice control and headphone jacks.
4. Preparing to Sync Your Remote
Before you start the syncing process, ensure that you have everything in place:
- Check that your Roku device is powered on and connected to your TV.
- Remove the battery cover from your new remote and insert fresh batteries.
- Ensure you are within range of the Roku device.
5. Step-by-Step Syncing Process
Now that you are prepared, follow these steps to sync your Roku replacement remote:
For Standard IR Remotes
- Point the remote at the Roku device.
- Press any button on the remote. The Roku device should respond if the remote is working.
For Enhanced Remotes
- Insert fresh batteries into the remote.
- Press and hold the Pairing button (located in the battery compartment) until the pairing light starts flashing.
- Once the Roku device recognizes the remote, the pairing light will stop flashing and remain on for a few seconds before turning off.
6. Troubleshooting Tips
If you encounter issues while syncing your Roku remote, try the following troubleshooting tips:
- Ensure the batteries are fresh and installed correctly.
- Restart your Roku device by unplugging it and plugging it back in.
- Ensure there are no obstacles between the remote and the Roku device for IR remotes.
- Try re-pairing the remote by repeating the steps outlined above.
7. Case Studies
Real-world scenarios provide valuable insights into common issues faced by users. Here are a few case studies:
Case Study 1: Lost Remote
John, a frequent Roku user, lost his remote during a move. After purchasing a replacement, he struggled to sync it. Following our step-by-step guide, he successfully synced the remote in under five minutes, restoring his access to his favorite shows.
Case Study 2: Battery Issues
Lisa experienced syncing issues due to dead batteries in her new remote. Once she replaced the batteries and followed the troubleshooting steps, she was able to sync the remote without issues.
8. Expert Insights
According to streaming technology experts, understanding the differences between standard and enhanced remotes is crucial for effective troubleshooting. Enhanced remotes generally provide a more reliable connection and additional features, making them the preferred choice for most users.
9. Conclusion
Syncing a Roku replacement remote is a straightforward process when you know the steps. Whether you have a standard IR remote or an enhanced version, following the instructions outlined in this guide will ensure that you can quickly regain control of your Roku device. Remember to check the batteries and troubleshoot where necessary. Happy streaming!
10. FAQs
1. Can I use any Roku remote with my device?
No, you need a compatible remote for your specific Roku model.
2. How do I know if my remote is an IR or enhanced remote?
If it requires a direct line of sight, it's likely an IR remote. Enhanced remotes usually have a pairing button.
3. What should I do if my remote won't sync?
Check battery installation, ensure the device is powered on, and try restarting your Roku device.
4. Can I use a Roku app instead of a remote?
Yes, you can download the Roku app on your smartphone and use it as a remote control.
5. How far can I be from the Roku device to sync the remote?
For enhanced remotes, you can be further away, while IR remotes require a direct line of sight.
6. Why does my remote stop working after a few minutes?
This may indicate battery issues or a need for re-pairing.
7. Is there a way to reset my Roku remote?
You can reset it by removing the batteries and pressing any button for a few seconds before re-inserting the batteries.
8. How often should I replace the batteries in my Roku remote?
This depends on usage, but generally, inspect them every few months for signs of wear.
9. Can I sync multiple remotes to one Roku device?
Yes, you can pair multiple remotes to a single Roku device.
10. What should I do if my Roku remote is damaged?
If damaged, consider purchasing an official replacement remote or use the Roku app as an alternative.