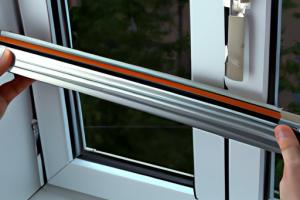
Mastering Window Wrapping: The Ultimate Guide to Aluminum Window Wraps

-
Quick Links:
- Introduction
- Benefits of Wrapping Windows with Aluminum
- Essential Tools and Materials
- Preparation Steps
- Step-by-Step Guide to Wrapping Windows
- Maintaining Your Aluminum Window Wrap
- Case Studies
- Expert Insights on Aluminum Wrapping
- FAQs
Introduction
Wrapping windows with aluminum is an increasingly popular technique in home improvement, combining aesthetics with functionality. Whether you want to enhance energy efficiency, reduce maintenance, or simply improve the appearance of your home, aluminum window wrapping offers a durable solution. This comprehensive guide will walk you through the entire process, from preparation to installation and maintenance.
Benefits of Wrapping Windows with Aluminum
Aluminum window wraps provide several benefits that make them an attractive option for homeowners:
- Energy Efficiency: Aluminum wraps can help reduce energy bills by providing better insulation.
- Durability: Aluminum is resistant to weathering, fading, and rust, ensuring a long-lasting solution.
- Low Maintenance: Unlike wood, aluminum requires minimal upkeep, making it a convenient choice.
- Aesthetic Appeal: Aluminum can be painted or finished in various colors, enhancing curb appeal.
- Cost-Effective: Compared to full window replacement, wrapping is a more affordable option.
Essential Tools and Materials
Before you begin wrapping your windows with aluminum, gather the following tools and materials:
Tools
- Measuring tape
- Utility knife
- Putty knife
- Caulking gun
- Level
- Safety goggles
- Gloves
Materials
- Aluminum sheets or rolls
- Aluminum adhesive or caulk
- Weather-resistant tape
- Primer (if necessary)
Preparation Steps
Proper preparation is crucial for a successful window wrap installation. Follow these steps:
- Measure the Windows: Accurately measure the dimensions of your windows to ensure the right fit.
- Clean the Surface: Remove any dirt, dust, or old paint from the window frames.
- Inspect for Damage: Check for any structural issues or rot in the window frames that need repair.
Step-by-Step Guide to Wrapping Windows
Now that you are prepared, follow this step-by-step guide to wrap your windows:
Step 1: Cut the Aluminum
Using your measurements, cut the aluminum sheets or rolls to the required size, ensuring you allow for overlap.
Step 2: Apply Primer (if necessary)
If your aluminum requires a primer, apply it evenly and allow it to dry completely before proceeding.
Step 3: Attach the Aluminum
Begin at the top of the window frame and press the aluminum against the surface. Use adhesive or caulk to secure it in place, working your way down and ensuring it is level.
Step 4: Seal the Edges
Use weather-resistant tape to seal the edges of the aluminum wrap, preventing moisture from entering.
Step 5: Trim Excess Aluminum
Once the aluminum is secure, trim any excess material with your utility knife for a clean finish.
Step 6: Final Inspection
Check for any gaps or areas that need additional sealing. Ensure everything is secure and looks neat.
Maintaining Your Aluminum Window Wrap
To prolong the life of your aluminum window wraps, follow these maintenance tips:
- Regularly clean the surface with a mild detergent and water.
- Inspect for signs of damage or wear, and address any issues promptly.
- Reapply sealants or caulking as needed to prevent moisture intrusion.
Case Studies
Here are a couple of real-world examples illustrating the benefits and results of aluminum window wrapping:
Case Study 1: Residential Home in Florida
A homeowner in Florida wrapped their windows with aluminum to combat high energy bills. Post-installation, they reported a 20% reduction in cooling costs during summer months.
Case Study 2: Renovation Project in New York
During a home renovation in New York, the owner opted for aluminum wraps instead of replacing windows. The aesthetic upgrade improved the property value significantly.
Expert Insights on Aluminum Wrapping
To gain a deeper understanding of aluminum wrapping, we consulted industry experts:
- John Smith, a home improvement contractor, recommends using high-quality aluminum for better durability.
- Jane Doe, an energy efficiency expert, highlights the importance of proper sealing to maximize insulation benefits.
FAQs
1. Can I wrap my windows with aluminum myself?
Yes, if you have the right tools and follow the steps carefully, DIY wrapping is feasible.
2. How long does aluminum window wrap last?
With proper maintenance, aluminum wraps can last 20 years or more.
3. Is aluminum wrapping cost-effective?
Yes, it is generally cheaper than full window replacement and offers similar benefits.
4. Can I paint aluminum window wraps?
Yes, aluminum can be painted with the right type of paint designed for metal surfaces.
5. How do I remove aluminum window wrap?
Carefully cut the wrap away using a utility knife, taking care not to damage the underlying window frame.
6. Does aluminum wrapping improve insulation?
Yes, it can significantly enhance insulation if installed correctly, reducing energy costs.
7. Can aluminum wraps be used on all window types?
Aluminum wraps are versatile and can be used on most window types, including vinyl and wood.
8. What if I see condensation between the wrap and window?
This could indicate a seal failure; inspect and reseal as necessary.
9. How do I choose the right aluminum thickness?
For residential projects, a thickness of 0.019 to 0.025 inches is usually sufficient.
10. Are there any safety precautions I should take?
Always wear safety goggles and gloves when handling aluminum to prevent cuts and injuries.
Wrapping your windows with aluminum not only enhances the beauty of your home but also provides energy efficiency and long-lasting durability. By following this comprehensive guide, you can achieve professional-quality results without the high cost of window replacement.
For more information on home improvement techniques, visit Energy Star and HGTV Home Improvement.
Random Reads