Mastering Poster Design: A Step-by-Step Guide to Creating Stunning Posters Using Microsoft Word

-
Quick Links:
- Introduction
- Why Use Microsoft Word for Poster Design?
- Getting Started
- Setting Up Your Document
- Designing Your Poster
- Adding Text and Images
- Finishing Touches
- Printing and Sharing Your Poster
- Case Studies
- Expert Insights
- FAQs
Introduction
Creating a poster can be a fun and engaging way to express creativity, whether for a school project, event advertisement, or personal artwork. Microsoft Word, a tool primarily known for word processing, surprisingly offers a variety of features that make it ideal for poster design. This guide will take you through the step-by-step process of creating a stunning poster using Microsoft Word.Why Use Microsoft Word for Poster Design?
Microsoft Word is widely available and user-friendly, making it accessible for beginners and experienced users alike. Here are some reasons to choose Word for your poster design: - **Accessibility**: Most people have access to Microsoft Word, making it a convenient choice. - **Familiarity**: Many users are already accustomed to the Word interface, reducing the learning curve. - **Templates and Tools**: Word provides various templates and design tools that simplify the poster creation process. - **Integration**: Easily integrate text and images, and utilize other Office applications for a complete project.Getting Started
Before diving into the design process, it’s essential to gather your materials and plan your poster. Here’s how to get started: - **Define Your Purpose**: Identify the goal of your poster (e.g., advertising an event, presenting information). - **Gather Content**: Assemble text, images, and any other elements you want to include. - **Choose a Theme**: Decide on a color scheme and style that aligns with your poster's purpose.Setting Up Your Document
1. **Open Microsoft Word**: Launch the application on your computer. 2. **Select a Blank Document**: Start with a new blank document to have full control over the layout. 3. **Set Page Size**: Go to the 'Layout' tab, click on 'Size', and choose 'More Paper Sizes' to set custom dimensions for your poster. Common poster sizes include 24"x36" or A3. 4. **Orientation**: Select 'Portrait' or 'Landscape' based on your design preference.Designing Your Poster
- **Background Color**: Choose a background color that complements your theme. You can do this by right-clicking on the page, selecting 'Format Background', and choosing a solid color or gradient. - **Grid and Guides**: Use gridlines to align your elements. Enable this feature under the 'View' tab by checking 'Gridlines'. - **Design Elements**: Add shapes and lines from the 'Insert' tab to create sections or borders.Adding Text and Images
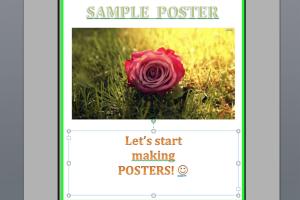
1. **Insert Text Boxes**: Use text boxes for titles, subtitles, and body text to control the placement and formatting. 2. **Font Selection**: Choose fonts that are clear and easy to read. Consider using bold fonts for titles. 3. **Insert Images**: Go to the 'Insert' tab, click on 'Pictures', and select images from your device or online sources. 4. **Image Formatting**: Adjust the size and position of images as needed. Use the 'Format' tab to apply effects and styles.Finishing Touches
- **Review Layout**: Ensure all elements are well-aligned and spaced evenly. - **Proofreading**: Check for any spelling or grammatical errors in your text. - **Final Adjustments**: Make any necessary adjustments to colors, sizes, or positions to enhance visual appeal.Printing and Sharing Your Poster
1. **Save Your Document**: Save your work in both Word format and PDF for better printing quality. 2. **Print Settings**: Adjust print settings for your specific printer. Make sure to select the appropriate paper size. 3. **Sharing Online**: If sharing digitally, consider exporting as a PDF or image file.Case Studies
- **Educational Institutions**: Many schools utilize Microsoft Word for student projects, demonstrating its effectiveness in educational settings. - **Community Events**: Local organizations often create posters for events using Word, showcasing the tool’s practicality for non-profits.Expert Insights
Design experts recommend keeping posters simple and focused. Utilization of white space is crucial for readability. Additionally, incorporating visuals enhances engagement.FAQs
- Can I use Microsoft Word for professional poster design? Yes, many professionals use Word due to its accessibility and range of tools.
- Are there templates available for poster design in Word? Yes, Word offers various templates that you can customize.
- What are the best dimensions for a poster in Word? Common sizes include 24"x36" for large posters and A3 for smaller designs.
- How do I insert images into my poster? Use the 'Insert' tab, then select 'Pictures' to add images from your device.
- Is it possible to print my poster at home? Yes, as long as your printer can handle the poster size.
- Can I share my poster online? Yes, save it as a PDF or image file for easy sharing.
- How do I ensure my text is readable? Use contrasting colors and legible fonts, and keep text concise.
- What is the best way to proofread my poster? Have someone else review it or use proofreading tools.
- Can I animate my poster for presentations? While Word does not support animations, you can create a dynamic presentation using PowerPoint.
- How do I access more advanced design features? Consider using graphic design software like Adobe Illustrator for more complex designs.
Random Reads
- How to update android device
- Simple steps turn on comcast cable box
- Whatsapp usage
- What to do if youve washed your airpods
- How to use ps3 controller wirelessly android
- Print wirelessly on iphone
- Programming rca universal remote
- How to organize a dresser drawer
- How to order a phone book
- Screenshot lenovo laptop