3 Simple Methods to Enable Spell Check in Microsoft Word

-
Quick Links:
- Method 1: Using the Options Menu
- Method 2: Keyboard Shortcut
- Method 3: Context Menu
- Importance of Spell Check
- Conclusion
- FAQs
Method 1: Using the Options Menu
Spell check is a crucial feature in Microsoft Word that helps ensure your writing is free from spelling errors. Here’s how to enable it using the Options Menu:
- Open Microsoft Word.
- Click on the File tab in the top left corner.
- Select Options from the menu that appears.
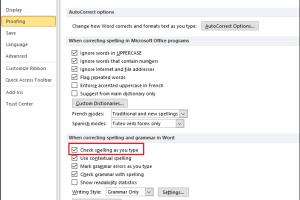
- In the Word Options window, click on Proofing.
- In the Proofing section, ensure the checkbox for Check spelling as you type is checked.
- Click OK to save your changes.
Method 2: Keyboard Shortcut
If you're looking for a quicker way to enable spell check, keyboard shortcuts can be a lifesaver. Follow these steps:
- While in your Word document, press Alt + F to open the File menu.
- Next, press T to open the Options.
- Press U to navigate to the Proofing settings.
- Use the arrow keys to navigate to Check spelling as you type and ensure it is checked.
- Press Enter to save your settings.
Method 3: Context Menu
Another straightforward approach to enable spell check is through the context menu. Here’s how:
- Open your document in Microsoft Word.
- Right-click on any word that is underlined with a red squiggly line, indicating a spelling error.
- Select Spelling from the context menu that appears.
- In the sub-menu, click on Enable Spell Check if available.
Importance of Spell Check
Spell check is vital for anyone who writes, whether for professional or personal purposes. Here are some key reasons why:
- Enhances Credibility: Proper spelling reflects professionalism and attention to detail.
- Improves Communication: Clear communication is essential, and spell check helps avoid misunderstandings.
- Saves Time: Catching errors early can save you the time of proofreading later.
Conclusion
Enabling spell check in Microsoft Word can significantly enhance your writing accuracy and improve overall communication. By following the methods outlined above, you can quickly turn on this essential feature and ensure your documents are polished and professional.
FAQs
1. What is spell check in Microsoft Word?
Spell check is a feature that automatically checks your text for spelling errors as you type, providing suggestions for corrections.
2. How do I know if spell check is turned on?
If words are underlined in red, spell check is on. You can also check the Proofing options in the settings.
3. Can I customize the spell check options?
Yes, you can customize spell check options in the Word Options under Proofing settings.
4. Is there a way to disable spell check?
Yes, you can disable it by unchecking the Check spelling as you type option in the Proofing settings.
5. Does spell check catch grammar errors?
Spell check primarily focuses on spelling errors. For grammar, you can enable grammar checking in the same settings menu.
6. How can I add words to the spell check dictionary?
You can right-click on a word that is marked as incorrect and select Add to Dictionary.
7. Why is my spell check not working?
Spell check may not work if it is disabled in the settings or if the language is set incorrectly.
8. Can I use spell check in different languages?
Yes, you can add and switch between different languages in the Language settings under the Review tab.
9. What should I do if spell check is missing?
Check if the feature is disabled in the Options menu or consider repairing your Office installation.
10. How often does spell check need to be updated?
Spell check updates typically occur with software updates to ensure the latest vocabulary and spellings are included.
Random Reads
- How to get hm rock climb pokemon diamond
- How to speed up windows xp computer
- How to speed up browsers
- How to make an ico file on windows and mac
- How to make an mp3 file
- How to make bar graphs
- How to open a door with a knife
- How to open a window screen
- How to add custom music to your sims game
- Mastering excel zip files