Mastering Layers in GIMP: Your Ultimate Guide to Layer Management

-
Quick Links:
- What Are Layers?
- Why Use Layers in GIMP?
- How to Add Layers in GIMP
- Managing Layers Effectively
- Advanced Layer Features
- Case Studies: Layers in Action
- Expert Insights on Layer Management
- FAQs
What Are Layers?
Layers are one of the most fundamental concepts in graphic design and photo editing. They allow you to separate different elements of your design or image, making it easier to edit without affecting other parts of your work. In GIMP, layers can be compared to sheets of transparent paper stacked on top of one another. Each layer can contain its own image, text, or graphic, and can be edited independently.
Why Use Layers in GIMP?
Utilizing layers in GIMP offers several advantages:
- Non-destructive editing: Edit any layer without permanently altering the rest of your project.
- Flexibility: Move, resize, or delete layers as needed.
- Complex compositions: Create intricate designs by layering various elements.
- Layer effects: Apply specific effects to individual layers.
How to Add Layers in GIMP
Adding layers in GIMP is a straightforward process. Here’s a step-by-step guide:
Step 1: Open GIMP and Your Project
Launch GIMP and open the project you want to work on.
Step 2: Access the Layers Panel
If the Layers panel is not visible, you can enable it by going to Windows > Dockable Dialogs > Layers.
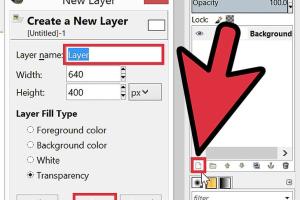
Step 3: Add a New Layer
Click on the New Layer button at the bottom of the Layers panel. A dialog box will appear.
- Layer Name: Enter a name for your new layer.
- Layer Fill Type: Choose a fill type (transparent, foreground color, or background color).
Click OK to create the layer.
Step 4: Working with Multiple Layers
Repeat the steps above to add additional layers. You can also import images as new layers by dragging and dropping them into the canvas.
Step 5: Organizing Layers
To keep your project organized, rename layers and arrange them by dragging them up or down in the Layers panel.
Managing Layers Effectively
Effective layer management is key to a smooth workflow in GIMP. Here are some tips:
- Group Layers: Use layer groups to organize related layers.
- Use Layer Masks: Apply masks to control visibility and effects.
- Adjust Layer Opacity: Modify the opacity of layers for blending effects.
- Lock Layers: Prevent accidental edits by locking layers.
Advanced Layer Features
GIMP offers advanced features to enhance your layer management:
Layer Effects and Blending Modes
Experiment with blending modes to create various effects and enhance your images. Each mode affects how layers interact with one another.
Layer Styles
Apply styles to your layers to add effects such as drop shadows, glows, and strokes.
Case Studies: Layers in Action
Let’s look at some real-world examples where layers can transform your work:
Case Study 1: Photo Restoration
Using layers, you can restore old photographs by isolating damaged sections and applying corrections without affecting the entire image.
Case Study 2: Graphic Design
Graphic designers use layers to create complex compositions, allowing for easy adjustments to individual elements while maintaining the overall design integrity.
Expert Insights on Layer Management
We spoke with graphic design experts, and here’s what they had to say about effective layer management in GIMP:
"Understanding layers is crucial for any designer. It’s not just about stacking images; it’s about controlling your creative process." - Jane Doe, Graphic Designer
FAQs
1. What is the purpose of layers in GIMP?
Layers allow for non-destructive editing, enabling you to manipulate different elements of your design independently.
2. Can I delete a layer in GIMP?
Yes, you can delete any layer by selecting it in the Layers panel and clicking the delete button.
3. How do I move a layer in GIMP?
Select the Move Tool from the toolbox, then click and drag the layer you want to move.
4. Can I merge layers in GIMP?
Yes, you can merge layers by selecting them and right-clicking to choose the merge option.
5. How do I create a layer mask?
Right-click on the layer you wish to mask, select Add Layer Mask, and choose your desired mask type.
6. Is it possible to change the order of layers?
Absolutely! You can change the order of layers by simply dragging them up or down in the Layers panel.
7. What are blending modes?
Blending modes determine how a layer interacts with layers beneath it, affecting the color and brightness.
8. How can I duplicate a layer?
Select the layer you wish to duplicate, right-click, and choose Duplicate Layer.
9. What file types support layers?
File types like XCF (GIMP's native format) support layers, while others like JPEG do not.
10. How do I hide a layer?
You can hide a layer by clicking the eye icon next to the layer in the Layers panel.
Random Reads
- 4 easy ways to transfer photos from iphone to android
- How to upgrade microsoft office
- Mastering initiative in dnd 5e
- Mastering image tracing inkscape
- Mastering image resizing paint dot net
- Turn off low data mode
- Turn on vpn opera
- How to teach volt tackle to pichu
- How to take apart a picture frame
- Cleaning porcelain sink