Step-by-Step Guide: How to Add a New Device to Your Apple Developer Portal

-
Quick Links:
- Introduction
- Understanding the Apple Developer Portal
- Why Add a New Device?
- Pre-requisites for Adding a Device
- Step-by-Step Guide to Add a New Device
- Troubleshooting Common Issues
- Best Practices for Device Management
- Conclusion
- FAQs
Introduction
In today's digital landscape, adding new devices to your Apple Developer Portal is crucial for developers aiming to test and deploy apps effectively. As Apple continues to enhance its ecosystem, understanding how to manage devices within the Apple Developer Portal becomes ever more critical.
Understanding the Apple Developer Portal
The Apple Developer Portal is a centralized platform where developers manage their applications, certificates, identifiers, and devices. It provides tools and resources for app development, including the ability to register devices for testing and deployment.
Why Add a New Device?
Adding a new device to your Apple Developer Portal enables you to:
- Test apps on real hardware.
- Ensure compatibility with different device types.
- Debug issues that may arise on specific devices.
- Manage provisioning profiles effectively.
Pre-requisites for Adding a Device
Before you start the process of adding a new device, make sure you have the following:
- An active Apple Developer account.
- The UDID (Unique Device Identifier) of the device you wish to add.
- Access to the Apple Developer Portal.
Step-by-Step Guide to Add a New Device
Follow these detailed steps to add a new device to your Apple Developer Portal:
Step 1: Locate the UDID of Your Device
To find the UDID of your device, connect it to your computer and open iTunes or Finder (for macOS Catalina and later). Click on your device, then click on the Serial Number to reveal the UDID. Copy it for the next step.
Step 2: Log in to Your Apple Developer Account
Navigate to the Apple Developer Account page and log in using your Apple ID and password.
Step 3: Access the Devices Section
Once logged in, click on the "Certificates, Identifiers & Profiles" section. Here, you'll find a list of your registered devices.
Step 4: Add a New Device
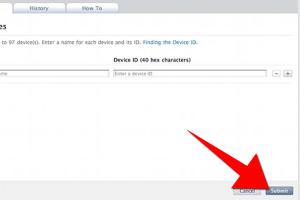
Click on the "+" button to add a new device. Enter a name for the device (e.g., "John’s iPhone") and paste the UDID you copied earlier. Click "Continue" and then "Register" to finalize the addition.
Step 5: Update Provisioning Profiles
After adding the device, you may need to update your provisioning profiles to include the new device. Navigate to the "Provisioning Profiles" section, select the profile you wish to update, and add the new device before saving your changes.
Troubleshooting Common Issues
If you encounter any problems while adding a new device, consider the following:
- UDID Not Recognized: Ensure you copied the UDID correctly. It should be a 40-character string.
- Login Issues: Verify your Apple ID credentials and make sure your developer account is active.
- Provisioning Profile Errors: Make sure that your provisioning profile includes the new device.
Best Practices for Device Management
To maintain a smooth experience while managing devices, consider these best practices:
- Regularly review and remove devices that are no longer in use.
- Keep track of UDIDs securely to avoid errors during registration.
- Document any changes made to provisioning profiles for future reference.
Conclusion
Adding a new device to your Apple Developer Portal is a straightforward process that can significantly enhance your app development and testing experience. By following the steps outlined in this guide, you can ensure that you have the necessary devices registered for your development needs.
FAQs
- 1. What is a UDID?
- The UDID (Unique Device Identifier) is a unique alphanumeric string assigned to every iOS device.
- 2. How many devices can I register?
- As of now, developers can register up to 100 devices per device type (iPhone, iPad, etc.) in their Apple Developer account.
- 3. Can I unregister a device?
- Yes, you can unregister devices from your account at any time through the Apple Developer Portal.
- 4. What happens if I exceed the device limit?
- If you exceed the limit, you will need to remove an existing device to add a new one.
- 5. Do I need to add devices for every app?
- No, once a device is registered in your portal, it can be used for any app you develop.
- 6. Can I use the same UDID for different developer accounts?
- No, each UDID must be registered under a specific Apple Developer account.
- 7. What if my device is not supported?
- Ensure your device is compatible with the latest iOS version and check the Apple Developer documentation for supported devices.
- 8. How do I find my Apple Developer ID?
- Your Apple Developer ID is the email address associated with your Apple Developer Account.
- 9. Is there a fee for creating an Apple Developer account?
- Yes, there is an annual fee of $99 for an individual developer account.
- 10. What documents do I need to register as a developer?
- You'll need a valid Apple ID, and for organization accounts, you may require legal documents and a D-U-N-S number.
For further reading, consider visiting the following resources:
- Apple Developer FAQs
- Apple Developer Documentation
- How to find your device's UDID
- Manage Devices in Apple Developer
Random Reads
- Quick effective ways to get rid of algae in your pool
- How to reduce microsoft word file size
- How to unblock clogged washing machine drain
- How to soundproof wall ceiling
- How to spawn ender dragon minecraft
- How to use microsoft word 2007
- How to use macros in excel
- How to stop seeing google ads
- How to stop squeaky door hinges
- How to replace shut off valves