Mastering the Art of Cutting Vinyl Plank Flooring: A Comprehensive Guide

-
Quick Links:
- Introduction
- Understanding Vinyl Plank Flooring
- Essential Tools for Cutting Vinyl Plank Flooring
- Preparation Before Cutting
- Cutting Techniques
- Step-by-Step Guide to Cut Vinyl Plank Flooring
- Common Mistakes to Avoid
- Case Studies and Real-World Examples
- Expert Insights and Tips
- FAQs
- Conclusion
Introduction
Installing vinyl plank flooring can be a rewarding DIY project that transforms your living space. However, cutting the planks accurately is crucial for a professional finish. In this comprehensive guide, we’ll delve into the best practices for cutting vinyl plank flooring, ensuring that your installation goes smoothly.
Understanding Vinyl Plank Flooring
Vinyl plank flooring is a popular choice among homeowners due to its durability, water resistance, and aesthetic appeal. Comprised of multiple layers, it often mimics the look of natural wood or stone.
- Core Layer: Provides stability and structure.
- Design Layer: Offers the aesthetic appeal with printed visuals.
- Wear Layer: Protects against scratches and stains.
Essential Tools for Cutting Vinyl Plank Flooring
Before starting your project, gather the following tools:
- Utility knife
- Straightedge or ruler
- Measuring tape
- Chalk line
- Carpenter's square
- Safety glasses
Preparation Before Cutting
Proper preparation can make a significant difference in the outcome of your flooring installation. Follow these steps:
- Acclimate the Planks: Let the vinyl planks sit in the room where they will be installed for at least 48 hours.
- Measure the Area: Take accurate measurements of the room and plan your cuts accordingly.
- Mark the Planks: Use a chalk line or pencil to mark where you need to cut.
Cutting Techniques
There are several effective techniques for cutting vinyl plank flooring:
1. Scoring and Snapping
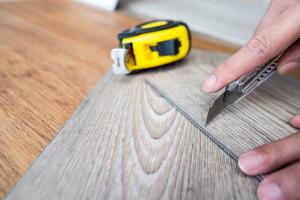
This is the most common method used to cut vinyl planks. It involves scoring the plank with a utility knife along the marked line and then snapping it along the score.
2. Sawing
For thicker planks or intricate cuts, a jigsaw or circular saw can be used. Ensure to use a fine-toothed blade to avoid chipping the vinyl.
3. Using a Miter Saw
This method is ideal for precise angled cuts. A miter saw allows for quick and clean cuts, especially for corner pieces.
Step-by-Step Guide to Cut Vinyl Plank Flooring
Here’s a detailed step-by-step guide to help you cut vinyl plank flooring successfully:
- Step 1: Measure and Mark the Plank
- Use your measuring tape to find the correct length.
- Mark the plank clearly with a pencil.
- Step 2: Score the Plank
- Place the straightedge along the marked line.
- Run the utility knife along the straightedge, applying firm pressure to create a deep score.
- Step 3: Snap the Plank
- Hold the plank on both sides of the scored line and apply pressure downwards to snap it along the score.
- Step 4: Smooth the Edges
- Inspect the cut edges and smooth any rough areas with sandpaper if necessary.
Common Mistakes to Avoid
Here are common pitfalls you should avoid when cutting vinyl plank flooring:
- Not measuring accurately before cutting.
- Using a dull knife, which can lead to jagged edges.
- Failing to acclimate the planks, which can cause expansion or contraction.
Case Studies and Real-World Examples
To understand the practical aspects of cutting vinyl flooring, let’s look at a few case studies:
Case Study 1: Residential Installation
A homeowner decided to cut vinyl plank flooring in their living room. By using the scoring method, they managed to achieve a professional finish without hiring a contractor.
Case Study 2: Commercial Space Renovation
In a commercial setting, a contractor opted for a jigsaw to make intricate cuts around obstacles like columns, ensuring a perfect fit.
Expert Insights and Tips
According to flooring experts, preparation is key to a successful installation. Here are some additional tips:
- Always cut the planks in a well-lit area to see your measurements clearly.
- Practice on scrap pieces before cutting the actual planks.
- Consider wearing a mask if you are sensitive to dust from cutting.
FAQs
Here are some frequently asked questions about cutting vinyl plank flooring:
1. Can I use a regular saw to cut vinyl plank flooring?
Yes, you can use a jigsaw or circular saw, but ensure to use a fine-toothed blade to minimize chipping.
2. Do I need to wear safety gear while cutting?
It’s advisable to wear safety glasses to protect your eyes from debris.
3. How do I cut vinyl plank flooring around corners?
Using a miter saw can help achieve precise angles for corner cuts.
4. Is scoring the only method to cut vinyl planks?
No, you can also use saws for more complex cuts, but scoring is the simplest method for straight cuts.
5. What if my cuts are not straight?
Ensure your straightedge is aligned correctly and apply consistent pressure while scoring.
6. Can I cut vinyl plank flooring with a utility knife?
Yes, a utility knife is the preferred tool for most cuts, especially for thinner planks.
7. How thick should my cutting blade be?
A fine-toothed blade of about 10-12 teeth per inch is ideal for cutting vinyl.
8. What should I do if my vinyl planks are too long?
Measure and mark the plank for cutting, then follow the cutting methods outlined in this guide.
9. Can I cut vinyl plank flooring without a straightedge?
While possible, using a straightedge ensures cleaner and straighter cuts.
10. What is the best way to avoid chipping when cutting?
Use a fine-toothed blade and score the plank deeply before snapping it.
Conclusion
Cutting vinyl plank flooring is a skill that can significantly impact the success of your flooring installation project. By following the guidelines and techniques outlined in this article, you can achieve professional results. Remember, practice makes perfect, so don’t hesitate to try out your cutting skills on scrap pieces before tackling the actual flooring. Happy flooring!