Unlock Linux on Windows: A Complete Guide to Enabling WSL

-
Quick Links:
- 1. Introduction
- 2. What is Windows Subsystem for Linux (WSL)?
- 3. Benefits of Using WSL
- 4. System Requirements for WSL
- 5. How to Enable WSL
- 6. Step-by-Step Guide to Install WSL
- 7. Troubleshooting Common WSL Issues
- 8. Case Studies and Real-World Applications
- 9. Expert Insights on WSL
- 10. The Future of WSL
- 11. FAQs
1. Introduction
The Windows Subsystem for Linux (WSL) has revolutionized the way developers and tech enthusiasts interact with the Linux operating system on Windows. Whether you are a seasoned developer or a beginner exploring programming, WSL allows you to run Linux tools directly on your Windows machine without the need for a virtual machine or dual-boot setup. This article provides a comprehensive guide on how to enable WSL, along with insights, expert tips, and troubleshooting advice.
2. What is Windows Subsystem for Linux (WSL)?
Windows Subsystem for Linux (WSL) is a compatibility layer designed to run Linux binaries natively on Windows 10 and Windows 11. It provides a robust environment for developers to use Linux command-line tools alongside the familiar Windows interface. With WSL, users can run Linux distributions such as Ubuntu, Debian, and Kali, among others, directly from their Windows machines.
3. Benefits of Using WSL
- Native Performance: WSL runs Linux binaries directly on Windows without emulation, offering near-native performance.
- Seamless Integration: It allows for easy file and command-line integration between Windows and Linux.
- Access to Linux Tools: Developers can use powerful Linux tools and applications for programming and system administration.
- Lightweight: Unlike virtual machines, WSL is lightweight and requires significantly less system resources.
4. System Requirements for WSL
Before enabling WSL, ensure your system meets the following requirements:
- Windows 10 Version 1903 or higher (Build 18362 or higher) or Windows 11.
- 64-bit processor with Second Level Address Translation (SLAT).
- Virtualization capabilities enabled in BIOS.
5. How to Enable WSL
Enabling Windows Subsystem for Linux is a straightforward process. Follow the steps outlined in the following sections to get started.
6. Step-by-Step Guide to Install WSL
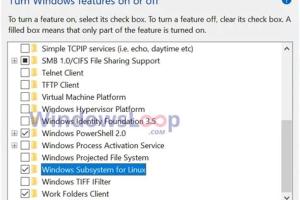
Step 1: Enable the Windows Subsystem for Linux Feature
- Open PowerShell as Administrator.
- Run the following command:
wsl --install - Restart your computer if prompted.
Step 2: Choose and Install a Linux Distribution
After enabling WSL, you need to install a Linux distribution. You can choose from several options available in the Microsoft Store. Follow these steps:
- Open the Microsoft Store.
- Search for your preferred Linux distribution (e.g., Ubuntu).
- Click on the distribution and select Install.
Step 3: Set Up Your Linux Distribution
After installation, launch your Linux distribution from the Start menu. You will be prompted to create a user account and password for your new Linux environment. Follow the on-screen instructions to complete the setup.
7. Troubleshooting Common WSL Issues
While enabling WSL is generally smooth, users may encounter some issues. Here are common troubleshooting tips:
- WSL is not recognized: Ensure you are running the command in an Administrator PowerShell window.
- Installation fails: Check for Windows updates and install any pending updates before retrying.
- Cannot access files: Make sure you’re using the correct file paths. WSL uses a different path format compared to Windows.
8. Case Studies and Real-World Applications
WSL has transformed workflows for many developers. For instance, a software engineer working on cross-platform applications found that WSL dramatically improved his productivity. By using Linux tools directly within Windows, he could compile code faster and test in a native environment without switching operating systems.
Another case study involves data scientists who leverage WSL to run data analysis scripts written in Python and R. The ability to seamlessly switch between Windows-based applications and Linux-based tools has streamlined their workflow, enhancing collaboration and efficiency.
9. Expert Insights on WSL
According to tech experts, WSL is a game-changer for developers who work in mixed environments. With the rise of DevOps and cloud computing, the ability to use Linux tools on Windows has become essential. Experts recommend WSL as a primary choice for developers who want to maintain productivity without the overhead of a virtual machine.
10. The Future of WSL
The future of WSL looks promising, with continuous updates from Microsoft enhancing functionality and performance. Upcoming features may include improved GUI support and better integration with Windows applications, making WSL an even more powerful tool for developers and tech enthusiasts alike.
11. FAQs
1. What is WSL?
WSL is a compatibility layer for running Linux binaries on Windows.
2. How do I enable WSL?
Use the command wsl --install in an Administrator PowerShell window.
3. Do I need a specific version of Windows?
You need Windows 10 version 1903 or higher, or Windows 11.
4. Can I run GUI applications with WSL?
Yes, WSL 2 supports GUI applications directly.
5. Is WSL free?
Yes, WSL is free and can be enabled on compatible Windows installations.
6. Can I use multiple Linux distributions?
Yes, you can install and use multiple Linux distributions concurrently.
7. What are the benefits of using WSL?
Benefits include native performance, seamless integration, and access to Linux tools.
8. How do I troubleshoot WSL issues?
Check for updates, ensure you're using Administrator mode, and verify file paths.
9. What distributions can I use with WSL?
You can use distributions like Ubuntu, Debian, and Kali, among others.
10. Is WSL suitable for professional development?
Yes, WSL is widely used in professional environments for development and testing.