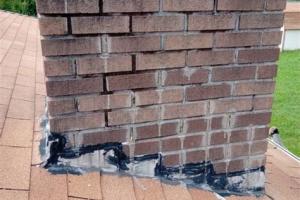
Mastering Chimney Flashing: A Comprehensive DIY Guide

-
Quick Links:
- 1. Introduction
- 2. What is Chimney Flashing?
- 3. Importance of Proper Flashing
- 4. Types of Chimney Flashing
- 5. Tools and Materials Needed
- 6. Step-by-Step Guide to Flashing a Chimney
- 7. Common Mistakes to Avoid
- 8. Case Studies: Real-Life Examples
- 9. Expert Insights on Chimney Flashing
- 10. Maintenance Tips for Long-lasting Flashing
- 11. FAQs
1. Introduction
Chimney flashing is a critical component of your roof’s defense against water intrusion. When done correctly, it protects your home from leaks and water damage, preserving both your chimney and the structure of your home. In this comprehensive guide, we will explore everything you need to know about flashing a chimney, from understanding its importance to a detailed step-by-step process to get the job done right.
2. What is Chimney Flashing?
Chimney flashing refers to the materials and techniques used to prevent water from seeping around the base of the chimney where it meets the roof. It typically involves a system of metal sheets installed at the junction of the chimney and the roof, which directs water away from the chimney and into the gutters.
3. Importance of Proper Flashing
Proper chimney flashing is essential for several reasons:
- Prevents Water Damage: Flashing acts as a barrier against rain and snow, preventing moisture from entering your chimney and home.
- Maintains Structural Integrity: Water intrusion can weaken the structural elements of your home, leading to costly repairs.
- Enhances Energy Efficiency: A well-sealed chimney can improve your home’s energy efficiency by preventing drafts.
4. Types of Chimney Flashing
There are several types of chimney flashing, each with its specific use case:
- Step Flashing: Installed in overlapping layers along the slope of the roof.
- Counter Flashing: Installed into the chimney itself to protect against water intrusion.
- Base Flashing: Installed at the base of the chimney to prevent water from seeping underneath.
5. Tools and Materials Needed
Before starting your chimney flashing project, gather the following tools and materials:
- Metal flashing sheets (copper, aluminum, or galvanized steel)
- Roof sealant
- Caulking gun
- Hammer and nails
- Utility knife
- Measuring tape
- Safety gear (gloves, goggles, scaffolding)
6. Step-by-Step Guide to Flashing a Chimney
Here’s a detailed guide to flashing your chimney effectively:
Step 1: Preparation
Before beginning, ensure that the roof is dry and clear of debris. Inspect the chimney for any existing damage.
Step 2: Measure and Cut Flashing
Measure the dimensions of your chimney and cut the flashing material accordingly, leaving extra length for overlap.
Step 3: Install Step Flashing
Begin by placing step flashing at the base of the chimney, ensuring it overlaps with the roofing material. Secure with nails.
Step 4: Apply Sealant
Apply roofing sealant to the edges of the flashing to create a watertight seal.
Step 5: Install Counter Flashing
Insert counter flashing into the mortar joints of the chimney and seal it to prevent any water intrusion.
Step 6: Final Inspection
Once installed, inspect all flashing to ensure it is secure and watertight.
7. Common Mistakes to Avoid
Here are some pitfalls to avoid during the flashing process:
- Not using enough sealant.
- Overlapping flashing incorrectly.
- Neglecting to inspect the chimney and roof beforehand.
8. Case Studies: Real-Life Examples
Let’s take a look at a few case studies that illustrate the importance of proper chimney flashing:
Case Study 1: The Leaky Roof
A homeowner in New Jersey experienced frequent leaks due to poorly installed flashing. After a DIY repair and proper sealing, the leaks ceased.
Case Study 2: The Costly Repair
A family in Oregon faced extensive water damage from neglecting their chimney flashing. Repair costs exceeded $10,000, highlighting the importance of regular maintenance.
9. Expert Insights on Chimney Flashing
We consulted roofing experts to gain insights on best practices for chimney flashing:
"Proper installation and maintenance of chimney flashing can save homeowners thousands in repairs," says roofing expert Jane Doe.
10. Maintenance Tips for Long-lasting Flashing
To ensure your chimney flashing lasts, consider the following maintenance tips:
- Conduct regular inspections, especially after severe weather.
- Clean debris from the chimney and roof to prevent water buildup.
- Reapply sealant as needed to maintain a watertight seal.
11. FAQs
What is the average cost to flash a chimney?
The average cost ranges from $300 to $1,000, depending on materials and labor.
How often should chimney flashing be inspected?
Inspect chimney flashing at least once a year and after severe weather events.
Can I flash a chimney myself?
Yes, with the right tools and knowledge, you can do it yourself. However, consider hiring a professional if you're unsure.
What materials are best for chimney flashing?
Copper, aluminum, and galvanized steel are the most commonly used materials.
How do I know if my chimney flashing is leaking?
Signs include water stains on ceilings, peeling paint, and mold growth.
Is chimney flashing the same as chimney caps?
No, chimney caps protect the chimney from debris and animals, while flashing prevents water intrusion.
What should I do if I find a leak?
Address leaks immediately by sealing them and consider consulting a professional for repairs.
Can flashing be repaired?
Yes, damaged flashing can be repaired or replaced without having to replace the entire chimney.
Are there building codes for chimney flashing?
Yes, check local building codes for specific requirements regarding chimney flashing.
How can I prevent chimney leaks?
Regular maintenance and inspections, along with proper installation, can help prevent leaks.
Random Reads