Step-by-Step Guide to Installing Vinyl Siding Like a Pro

-
Quick Links:
- Introduction
- Benefits of Vinyl Siding
- Tools and Materials Needed
- Pre-installation Preparations
- Installation Steps
- Post-installation Tips
- Case Studies
- Expert Insights
- FAQs
Introduction
Vinyl siding has become a popular choice among homeowners due to its durability, affordability, and low maintenance requirements. This comprehensive guide will walk you through the process of installing vinyl siding, ensuring that you achieve professional results even as a DIY enthusiast.
Benefits of Vinyl Siding
Vinyl siding offers numerous advantages that make it an attractive choice for home exteriors:
- Durability: Resistant to weather, pests, and rot.
- Low Maintenance: Requires minimal upkeep compared to wood siding.
- Cost-Effective: Generally cheaper than other siding materials.
- Variety of Styles: Available in various colors and designs to match your home’s aesthetic.
- Energy Efficiency: Insulated options available to help with energy costs.
Tools and Materials Needed
Before you begin your siding project, gather the following tools and materials:
Tools
- Measuring tape
- Chalk line
- Utility knife
- Hammer
- Level
- Power drill
- Vinyl siding cutter (optional)
- Safety goggles
- Work gloves
Materials
- Vinyl siding panels
- J-channel trim
- Corner posts
- Starter strips
- Nails (specifically for vinyl siding)
- Insulation (if desired)
Pre-installation Preparations
Before you start installing vinyl siding, proper preparation is key to ensuring a smooth process:
- Inspect the Structure: Ensure that your home’s walls are in good condition, free from rot or mold.
- Remove Old Siding: If replacing siding, carefully remove the old material and repair any damage.
- Prepare the Surface: Clean the area and make necessary repairs to the underlying structure.
- Measure and Plan: Use your measuring tape and chalk line to plan the layout of your siding.
Installation Steps
Now, it’s time to dive into the installation process. Follow these detailed steps to install vinyl siding:
Step 1: Install the Starter Strip
The starter strip sets the foundation for your siding installation.
- Measure and cut the starter strip to fit the width of your home.
- Attach the starter strip to the bottom of the wall, ensuring it’s level.
Step 2: Install Corner Posts
Corner posts provide a clean edge for your siding panels.
- Measure and cut corner posts to the height of your wall.
- Attach corner posts at each corner, ensuring they’re plumb and secure.
Step 3: Install J-channel Trim
The J-channel trim helps finish the edges of the siding.
- Cut J-channel pieces to fit around windows and doors.
- Attach J-channel to the wall, ensuring a snug fit against the siding panels.
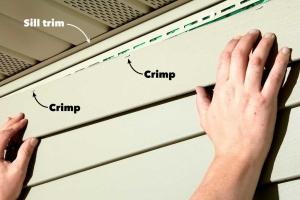
Step 4: Install Vinyl Siding Panels
Now, it’s time to install the siding panels.
- Start at one end of the wall and fit the first panel into the starter strip.
- Fasten the panel using nails, leaving a small gap for expansion.
- Continue adding panels, overlapping them as directed by the manufacturer.
Step 5: Finish with Accessories
Finally, add any finishing touches:
- Install trim around windows and doors.
- Ensure all panels are secure and make any necessary adjustments.
Post-installation Tips
After installation, consider these tips for maintaining your vinyl siding:
- Regularly clean the siding to prevent dirt buildup.
- Inspect for damage or wear annually.
- Touch up any scratches or dents as needed.
Case Studies
Many homeowners have successfully installed vinyl siding with remarkable results. Here are a few case studies:
Case Study 1: Transforming a Historic Home
A family in a historic district opted for vinyl siding to preserve their home's character while improving energy efficiency. By choosing a color that matched the original design, they enhanced curb appeal and reduced heating costs by 20%.
Case Study 2: DIY Success Story
A couple took on the challenge of installing vinyl siding themselves, saving over $5,000 in labor costs. They documented their journey online, sharing tips and photos that inspired countless others to embark on similar projects.
Expert Insights
We spoke with industry professionals to gather insights on best practices for vinyl siding installation:
"Proper measurement and planning are crucial. Mistakes can be costly, so take your time at the start." - Jane Smith, Home Improvement Expert
"Using quality materials can make a significant difference in the longevity of your siding." - John Doe, Contractor
FAQs
1. How long does vinyl siding last?
Vinyl siding can last 20-40 years with proper maintenance.
2. Can I install vinyl siding over existing siding?
It’s possible, but it’s best to remove old siding for a smoother finish.
3. Do I need a permit to install vinyl siding?
Check with your local building authority, as permits may be required.
4. What is the cost of vinyl siding installation?
The average cost ranges from $2 to $7 per square foot, including materials and labor.
5. How do I clean vinyl siding?
Use a mixture of soap and water, and a soft-bristle brush for tougher stains.
6. Is vinyl siding eco-friendly?
Vinyl siding is recyclable, making it a more eco-friendly option compared to other materials.
7. Can I paint vinyl siding?
While it’s possible, it’s not recommended as it can void warranties and affect durability.
8. What colors are available for vinyl siding?
Vinyl siding is available in a wide range of colors and finishes, allowing for customization.
9. How can I prevent mold on my vinyl siding?
Regular cleaning and ensuring proper drainage will help prevent mold growth.
10. What should I do if my vinyl siding becomes damaged?
Replace the damaged panel or consult a professional for repairs.
By following this comprehensive guide, you can successfully install vinyl siding and enhance your home's exterior. Remember, patience and attention to detail will yield the best results!