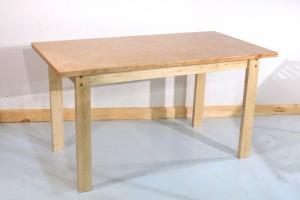
Crafting Your Own Table: A Comprehensive Guide to DIY Table Making

-
Quick Links:
- Introduction
- Types of Tables
- Materials and Tools Needed
- Step-by-Step Guide to Making a Table
- Finishing Touches
- Case Studies
- Expert Insights
- FAQs
Introduction
Crafting your own table can be a rewarding project that not only enhances your living space but also provides a unique piece of furniture tailored to your style and needs. In this guide, we will walk you through the entire process of making a table—from choosing the right type and materials to the final finishing touches. Whether you're a seasoned woodworker or a complete beginner, this comprehensive guide will equip you with the knowledge to create a stunning table that complements your home.
Types of Tables
Before diving into the construction process, it’s essential to understand the different types of tables you can make. Here are a few popular options:
- Dining Table: A large table for family meals and gatherings.
- Coffee Table: A smaller table used in living rooms for placing drinks or books.
- Side Table: Compact and functional, perfect for beside sofas or beds.
- Desk: A dedicated workspace for productivity.
- Outdoor Table: Durable tables designed for patio or garden use.
Materials and Tools Needed
Selecting the right materials and tools is crucial for the success of your table-making project. Below are the essential items you will need:
Materials
- Wood (hardwood or softwood depending on your table type)
- Wood glue
- Wood screws
- Sandpaper
- Finish (stain, paint, or sealant)
Tools
- Table saw or circular saw
- Drill
- Screwdriver
- Measuring tape
- Clamps
- Square
- Level
Step-by-Step Guide to Making a Table
Follow these steps to create your own table. The process may vary slightly depending on the type of table you choose to make, but the overall method remains consistent.
Step 1: Planning Your Design
Start by sketching your table design. Consider the dimensions, shape, and style you want. Measure your space to ensure the table will fit perfectly.
Step 2: Cutting the Wood
Measure and mark your wood pieces according to your design. Use a table saw or circular saw for precise cuts. Be sure to wear safety goggles and follow all safety precautions.
Step 3: Assembling the Table Top
Arrange your wood pieces for the table top. Apply wood glue between the joints and use clamps to hold them together. Let the glue dry according to the manufacturer's instructions.
Step 4: Attaching the Legs
For stability, the legs should be attached at the corners of the table. You can use brackets and screws for a robust connection. Ensure the table is level before securing the legs.
Step 5: Sanding the Surface
Use sandpaper to smooth the surface of the table. Start with a coarser grit and gradually move to a finer grit for a polished finish.
Step 6: Applying Finishes
Apply your chosen finish (stain, paint, or sealant) to protect the wood and enhance its appearance. Follow the application instructions for the best results.
Finishing Touches
Once your table is assembled and finished, inspect it for any imperfections. Touch up any rough spots and ensure everything is securely fastened. Consider adding decorative elements like coasters or table runners to showcase your new creation.
Case Studies
To better understand the process, let’s explore some real-world examples of DIY table projects:
Case Study 1: The Rustic Farmhouse Table
A family wanted a large dining table for their kitchen. They opted for reclaimed wood to create a rustic look. With a simple design and a few coats of stain, they crafted a stunning centerpiece for family gatherings.
Case Study 2: The Modern Coffee Table
An individual sought to make a sleek coffee table for their contemporary living room. Using plywood and hairpin legs, they achieved a minimalist design that perfectly complemented their decor.
Expert Insights
According to professional woodworkers and furniture makers, the key to a successful DIY table project lies in careful planning and attention to detail. Wood Magazine emphasizes the importance of precise measurements and quality materials for durability and aesthetics.
FAQs
1. What type of wood is best for making a table?
Hardwoods like oak, maple, or walnut are ideal for durability, while softer woods like pine are more affordable and easier to work with.
2. How long does it take to make a table?
Depending on your experience and the complexity of the design, it can take anywhere from a few hours to several days.
3. Do I need special tools to make a table?
Basic woodworking tools are sufficient, but having a table saw and a drill will make the process much easier.
4. Can I make a table without prior woodworking experience?
Yes! Many beginners successfully create tables by following step-by-step guides and starting with simple designs.
5. What is the best finish for a table?
It depends on your desired look and usage. Stains enhance the wood's natural beauty, while paints offer a more colorful option.
6. How can I ensure my table is stable?
Ensure that all legs are the same length and securely attached. Use a level during assembly to check stability.
7. What should I do if my table has scratches?
You can sand the affected area and reapply the finish, or use wood filler for deeper scratches before refinishing.
8. Is it necessary to use clamps when gluing wood?
Yes, clamps help hold the pieces together while the glue dries, ensuring a strong bond.
9. Can I use plywood to make a table?
Absolutely! Plywood is an affordable and versatile option for table making, especially for the tabletop.
10. Are there any online resources for table-making tutorials?
Many woodworking websites, such as Family Handyman, offer detailed tutorials and plans for various table designs.
Random Reads