Customize Your Experience: How to Create a Unique Mouse Cursor on Windows

-
Quick Links:
- Introduction
- Understanding Mouse Cursors
- Why Customize Your Mouse Cursor?
- Tools and Software Needed
- Designing Your Cursor
- Installing Your Custom Cursor
- Troubleshooting Common Issues
- Advanced Customization Techniques
- Case Studies and Examples
- Conclusion
- FAQs
Introduction
In today's digital world, personalization is key to making your computer truly yours. One often overlooked aspect of customization is the mouse cursor. This guide will walk you through the process of creating your own custom mouse cursor on Windows, allowing you to express your unique style and enhance your user experience.
Understanding Mouse Cursors
The mouse cursor is an essential part of the graphical user interface. It serves as the primary means of navigation and interaction with your computer. Windows offers a variety of default cursors, but these can often feel generic and uninspiring.
Mouse cursors can come in different forms such as:
- Arrow Cursor
- Hand Cursor
- Text Cursor
- Busy Cursor
Why Customize Your Mouse Cursor?
Customizing your mouse cursor can improve your computing experience in various ways:
- Personal Expression: A custom cursor reflects your personality and style.
- Improved Visibility: Bright or uniquely designed cursors can be easier to spot.
- Enhanced User Experience: Custom cursors can improve workflow and productivity.
Tools and Software Needed
Before you start creating your custom cursor, you will need some tools:
- Graphics Software: Software like Adobe Illustrator, GIMP, or Inkscape can be used for designing your cursor.
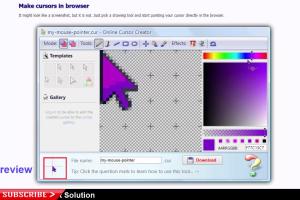
- Cursor Creation Software: Tools like RealWorld Cursor Editor or Cursor.cc are great for assembling your design.
- File Format Knowledge: Understanding the .CUR and .ANI formats is essential for cursor files.
Designing Your Cursor
Step 1: Create Your Design
Using your chosen graphics software, create a design for your cursor. Keep in mind the following:
- Size: The standard size for a cursor is 32x32 pixels.
- Color: Use colors that contrast well with your desktop background.
- Style: Think about the purpose of your cursor. A fun design could be for casual use, while a simple design might be better for work.
Step 2: Save Your Design
Once you’re satisfied with your design, save the file in a format suitable for cursors, typically as a .PNG or .BMP file.
Step 3: Convert to Cursor Format
Using cursor creation software, import your design and convert it to the .CUR or .ANI format. Follow the software's specific instructions to ensure a successful conversion.
Installing Your Custom Cursor
Once your cursor is created, it's time to install it:
- Open the Control Panel.
- Navigate to Mouse settings.
- Go to the Pointer tab.
- Click on the Browse button.
- Locate your custom cursor file and select it.
- Click OK to apply your changes.
Troubleshooting Common Issues
Sometimes, issues may arise during the installation or use of your custom cursor:
- Cursor Not Showing: Check if the file format is correct and that you followed the installation steps accurately.
- Cursor Appearing Blurry: Ensure that your cursor design is in a resolution suitable for display.
- Default Cursor Reverts: This may happen due to system updates or changes. You might need to reinstall your cursor.
Advanced Customization Techniques
For those who want to take their cursor customization to the next level, consider these advanced techniques:
- Animation: Create animated cursors (.ANI) for an eye-catching effect.
- Custom Sets: Design a complete set of cursors for different actions (e.g., clicking, dragging).
- Theming: Integrate your cursor with other UI elements for a cohesive look.
Case Studies and Examples
Many users have transformed their Windows experience with custom cursors. For example:
- Case Study 1: A graphic designer created a cursor themed around their favorite character, enhancing their creative workspace.
- Case Study 2: A gamer developed a set of animated cursors that reflected their gaming style, making their desktop feel more immersive.
Conclusion
Creating a custom mouse cursor on Windows is a fun and rewarding way to personalize your computer. With the right tools and a bit of creativity, you can make your cursor a true reflection of your style. Explore the possibilities and make your everyday computing experience uniquely yours!
FAQs
1. Can I use any image as a mouse cursor?
No, the image must be in a compatible format, typically .CUR or .ANI, and should adhere to the size limitations for cursors.
2. How do I change my cursor back to default?
In Mouse settings, you can select the default scheme from the dropdown menu under the Pointer tab.
3. Can I animate my custom cursor?
Yes! You can create animated cursors in .ANI format.
4. What’s the best software for designing cursors?
Popular options include RealWorld Cursor Editor and Cursor.cc.
5. Is there a size limit for cursor designs?
The standard size is 32x32 pixels, but larger sizes can be created for specific purposes.
6. How do I share my custom cursor with others?
You can share the .CUR or .ANI files directly with others, or upload them to a cursor sharing website.
7. Will my custom cursor work on other computers?
Yes, but the cursor files need to be transferred to the other machines and properly installed.
8. Can I customize cursors for specific applications?
Some applications may allow for custom cursors, but this typically requires specific settings within the application itself.
9. What if my custom cursor doesn't display correctly?
Check the file format and resolution. Ensure that the cursor is in a supported format and correctly installed.
10. Are there any risks to customizing my cursor?
Generally, no, but make sure to download cursor files from trusted sources to avoid malware.