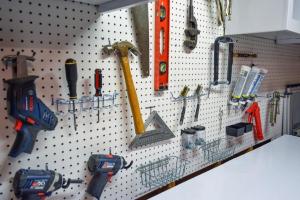
Ultimate Guide on How to Mount a Pegboard for Maximum Organization

-
Quick Links:
- 1. Introduction
- 2. Tools and Materials Needed
- 3. Choosing the Right Location
- 4. Measuring and Marking
- 5. Mounting Techniques
- 6. Pegboard Accessories
- 7. Design Ideas for Your Pegboard
- 8. Maintenance and Care
- 9. Case Studies
- 10. Conclusion
- 11. FAQs
1. Introduction
Mounting a pegboard can be one of the most efficient ways to declutter and organize your space, whether it's in a garage, workshop, or even in a creative studio. Pegboards offer versatile storage solutions, allowing you to customize your layout according to your specific needs. In this guide, we will walk you through the entire process of mounting a pegboard, from selecting the right materials to exploring innovative design ideas.
2. Tools and Materials Needed
Before diving into the installation process, it's essential to gather all necessary tools and materials. Here's what you'll need:
- Pegboard sheets (standard size is 2x4 feet)
- Pegboard hooks and accessories
- Drill and drill bits
- Level
- Measuring tape
- Pencil
- Wall anchors (if mounting on drywall)
- Screws (1.25-inch wood screws recommended)
- Stud finder (optional but recommended)
3. Choosing the Right Location
Choosing the right location for your pegboard is crucial. Consider the following factors:
- Height: Ensure it's at a comfortable height for access.
- Lighting: Good lighting will help you see your tools and accessories clearly.
- Proximity: Position it near your workbench or frequently used areas.
4. Measuring and Marking
Once you've chosen a location, measuring and marking is the next step:
- Use the measuring tape to find the desired height and width for the pegboard.
- Mark the corners of the pegboard on the wall using a pencil.
- Ensure your marks are level using the level tool.
5. Mounting Techniques
There are various methods to mount a pegboard. Here are two common techniques:
5.1 Directly to Wall Studs
If you're mounting the pegboard on a wall with studs, this is the most secure method:
- Locate the studs using a stud finder.
- Drill pilot holes into the studs at the marked points.
- Attach the pegboard using screws, ensuring it is level.
5.2 Using Wall Anchors
If there are no studs available, wall anchors can provide a secure hold in drywall:
- Drill holes at the marked points and insert wall anchors.
- Attach the pegboard by screwing it into the anchors.
6. Pegboard Accessories
Maximize your pegboard's functionality with these accessories:
- Hooks: Available in various sizes and shapes for different tools.
- Baskets: Great for holding smaller items.
- Shelves: For larger tools or materials.
7. Design Ideas for Your Pegboard
Here are some creative design ideas to inspire:
- Themed organization: Arrange tools by color or type.
- Artistic displays: Use the pegboard as a canvas for art supplies.
- Seasonal rotation: Change the layout based on the season or projects.
8. Maintenance and Care
Keeping your pegboard in top shape is essential:
- Regularly check hooks and accessories to ensure they are secure.
- Wipe down the pegboard to remove dust or debris.
- Reorganize items as needed to maintain functionality.
9. Case Studies
Here we explore how different individuals have successfully mounted and utilized pegboards in various settings:
9.1 Home Workshop
A homeowner transformed their cluttered garage by installing a pegboard over their workbench. By categorizing tools and materials, they improved workflow efficiency by 30%.
9.2 Craft Studio
A craft enthusiast utilized a pegboard to organize art supplies. By implementing a color-coded system, they could easily access materials, leading to a 20% increase in crafting productivity.
10. Conclusion
Mounting a pegboard is a simple yet effective way to organize your space, whether for tools, crafts, or other items. With the right tools, techniques, and a little creativity, you can create a practical and aesthetically pleasing storage solution.
11. FAQs
1. What size pegboard should I use?
Standard sizes are 2x4 feet, but you can customize based on your space and needs.
2. Can I paint a pegboard?
Yes, pegboards can be painted for aesthetic purposes; just ensure to use appropriate paint for wood or metal surfaces.
3. How much weight can a pegboard hold?
This varies based on installation; typically, it can hold up to 50 pounds if properly mounted to studs.
4. Are there different types of pegboards?
Yes, pegboards come in wood, metal, and plastic varieties, each suitable for different uses.
5. Can I install a pegboard on a concrete wall?
Yes, but you will need masonry anchors and a different mounting technique.
6. What tools can I hang on a pegboard?
You can hang various tools, including hammers, screwdrivers, wrenches, and more.
7. How do I keep items from falling off the pegboard?
Use rubber grips or specific pegboard hooks that lock into place to secure items better.
8. Can pegboards be used outdoors?
Yes, but ensure you use weather-resistant materials and paint for outdoor durability.
9. How far from the wall should a pegboard be mounted?
Typically, 1 inch away from the wall to allow for hook placement and ease of access.
10. Can I use pegboards for decorative purposes?
Absolutely! Many people use pegboards to display art, photos, or plants creatively.
Random Reads
- How to remove vented hood fan
- How to remove venetian blinds
- How to hide rows in excel
- How to hide pipes
- Mastering aim in counter strike
- Mastering microsoft powerpoint
- Mastering microsoft paint
- How to remove leading or trailing zeros in excel
- How to turn on microsoft defender windows 10 11
- How to turn on lg phone