Ultimate Guide to Placing and Finishing a Concrete Floor: Step-by-Step Techniques

-
Quick Links:
- Introduction
- Tools and Materials Needed
- Preparing the Site
- Mixing Concrete
- Placing Concrete
- Finishing Concrete
- Curing Concrete
- Case Studies
- Expert Insights
- FAQs
Introduction
Concrete floors are an excellent choice for both residential and commercial spaces due to their durability, versatility, and aesthetic appeal. Learning how to properly place and finish a concrete floor can save you money and provide a professional-quality finish. This comprehensive guide will walk you through each step of the process, from selecting the right materials to achieving a flawless finish.
Tools and Materials Needed
Essential Tools
- Concrete mixer
- Shovel
- Float
- Edger
- Trowel
- Level
- Measuring tape
- Vibrator (optional)
Materials
- Concrete mix (choose based on strength and usage)
- Water
- Reinforcement materials (rebar or wire mesh)
Preparing the Site
Before you start with the concrete placement, proper site preparation is crucial. Here are the detailed steps:
- Clear the Area: Remove any debris, vegetation, or old flooring.
- Excavate: Dig to the required depth based on your concrete thickness and sub-base.
- Compact the Soil: Use a plate compactor to ensure a stable base.
- Install Forms: Use wooden or metal forms to outline the area where the concrete will be poured.
Mixing Concrete
Mixing concrete correctly is vital for its strength and durability. Here’s how to do it:
- Calculate the Amount: Determine how much concrete you will need using the formula: Length x Width x Depth = Volume.
- Follow the Mix Ratio: A common concrete mix ratio is 1:2:3 (cement:sand:gravel).
- Mix Thoroughly: Use a concrete mixer for a homogeneous mix, adding water slowly until the desired consistency is achieved.
Placing Concrete
Once your concrete is mixed, it’s time to pour it into the forms:
- Pouring: Start pouring the concrete into the forms, beginning at one end and working your way to the other.
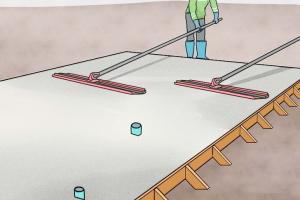
- Leveling: Use a screed board to level the surface of the concrete.
- Consolidation: Use a vibrator to eliminate air pockets and ensure the concrete settles evenly.
Finishing Concrete
Finishing techniques can vary based on the desired look and functionality:
Techniques
- Floating: Use a float to smooth the surface and fill any voids.
- Edging: Create a clean edge using an edger tool.
- Troweling: For a smooth finish, use a trowel to further refine the surface.
Curing Concrete
Curing is essential for the concrete to achieve its optimum strength:
- Keep Moist: Cover the concrete with wet burlap or use curing compounds.
- Duration: Cure for at least 7 days for maximum strength.
Case Studies
Let’s explore a few real-world examples of successful concrete flooring projects:
Residential Garage Floor
A homeowner undertook a DIY project to pour a garage floor. They prepared the site meticulously, mixed the concrete in small batches, and finished with a broom finish for traction.
Commercial Space
A local coffee shop opted for polished concrete flooring. They used a specialized grinding technique to achieve a sleek, shiny finish that is easy to maintain.
Expert Insights
We consulted concrete professionals to share their best tips:
"Always check the weather before pouring. Rain or extreme heat can impact the curing process." - John Doe, Concrete Specialist
FAQs
1. How long does it take for concrete to cure completely?
Concrete typically takes 28 days to reach its full strength, but initial curing can be observed within 7 days.
2. What is the best temperature to pour concrete?
The ideal temperature for pouring concrete is between 50°F and 85°F to ensure proper curing.
3. Can I place concrete in the rain?
It's best to avoid pouring concrete in the rain. If unavoidable, cover the area to protect it.
4. How do I know if my concrete mix is correct?
The mix should be workable but not too watery. A good test is to form a ball with the mix; it should hold shape without crumbling.
5. What tools can I rent for a concrete project?
Consider renting a concrete mixer, power trowel, and concrete vibrator for efficiency.
6. Is it necessary to use a vapor barrier?
Yes, a vapor barrier prevents moisture from coming up through the concrete, which is especially important in basements.
7. How can I add color to my concrete?
You can use concrete dyes or stains during the mixing process or apply them to the surface after it has cured.
8. Can I walk on newly poured concrete?
It's advisable to wait at least 24 to 48 hours before walking on newly poured concrete.
9. What are the signs of improperly cured concrete?
Look for cracking, scaling, or a rough surface texture as signs of inadequate curing.
10. How can I maintain my concrete floor?
Regularly clean the surface and apply a sealant every few years to protect against stains and wear.
Conclusion
Placing and finishing a concrete floor can seem daunting, but with the right tools, techniques, and insights, you can achieve professional results. Whether for a home or commercial project, this guide serves as a valuable resource to ensure your success. Happy pouring!
References
For further reading and expert advice, check these resources:
Random Reads
- How to make online games
- How to make oobleck without cornstarch
- How to make a laser
- How to make a hologram
- Mastering cygwin windows
- Mastering digital privacy permanently deleting files
- Transfer photos computer to ipad
- Ultimate guide to level 99 in every skill runesape f2p
- Ultimate guide to spring cleaning your room
- Mastering ping in linux