Ultimate Guide on How to Test Fluorescent Bulbs: Tips & Techniques

-
Quick Links:
- 1. Introduction
- 2. Understanding Fluorescent Bulbs
- 3. Why Test Fluorescent Bulbs?
- 4. Tools Required for Testing
- 5. Step-by-Step Process to Test Fluorescent Bulbs
- 6. Troubleshooting Common Issues
- 7. Case Studies on Fluorescent Bulb Testing
- 8. Expert Insights on Fluorescent Bulbs
- 9. FAQs
- 10. Conclusion
1. Introduction
Fluorescent bulbs are an energy-efficient lighting option commonly found in homes, offices, and commercial spaces. However, like all lighting solutions, they can sometimes malfunction. Understanding how to test fluorescent bulbs can save you time and money, ensuring that your lighting system functions optimally. In this comprehensive guide, we will explore the methods to test fluorescent bulbs effectively, troubleshooting tips, and expert insights.
2. Understanding Fluorescent Bulbs
Fluorescent bulbs operate by passing an electric current through a gas, which produces ultraviolet light that excites a phosphor coating inside the bulb. This process results in visible light. Below are the main types of fluorescent bulbs:
- T12: The traditional, larger diameter bulb.
- T8: A more energy-efficient option, thinner than T12.
- T5: The most energy-efficient and compact option.
Understanding their structure and functionality is essential for effective testing.
3. Why Test Fluorescent Bulbs?
Testing fluorescent bulbs is crucial for several reasons:
- Energy Efficiency: Identifying faulty bulbs can help maintain energy efficiency.
- Cost Savings: Replacing only non-functional bulbs can save money on electricity.
- Safety: Faulty bulbs can pose safety hazards.
4. Tools Required for Testing
Before you begin testing, gather the necessary tools:
- Multimeter: For checking voltage and continuity.
- Non-contact Voltage Tester: To ensure safety by confirming the power is off.
- Replacement Bulbs: For testing and comparison.
- Protective Gear: Gloves and safety glasses to ensure safety during testing.
5. Step-by-Step Process to Test Fluorescent Bulbs
Follow these detailed steps to effectively test your fluorescent bulbs:
Step 1: Safety First
Ensure that the power to the fixture is turned off to prevent electrical shock. Use a non-contact voltage tester to confirm.
Step 2: Remove the Bulb
Carefully remove the fluorescent bulb from its fixture. Handle the bulb with care to avoid breakage.
Step 3: Visual Inspection
Examine the bulb for any visible signs of damage such as blackened ends, cracks, or flickering filaments.
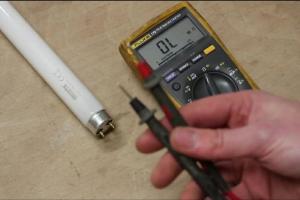
Step 4: Test with a Multimeter
Set your multimeter to the appropriate setting and check:
- Continuity: Touch the probes to the ends of the bulb. A reading indicates the filament is intact.
- Voltage: Check the voltage at the fixture to ensure it is functioning correctly.
Step 5: Test the Starter
If your bulb has a starter, test it separately. A faulty starter can prevent the bulb from lighting.
Step 6: Replace and Test
If you suspect the bulb is faulty, replace it with a known working bulb and test the fixture.
6. Troubleshooting Common Issues
Here are a few common issues and their solutions:
| Issue | Possible Cause | Solution |
|---|---|---|
| Flickering Light | Loose connections or faulty ballast | Tighten connections or replace the ballast |
| Dim Light | Old or failing bulb | Replace the bulb |
| No Light | Faulty bulb or starter | Test and replace as needed |
7. Case Studies on Fluorescent Bulb Testing
In a recent case study conducted by the Energy Efficiency Institute, businesses that regularly tested their fluorescent bulbs reported a 20% increase in lighting efficiency and a significant reduction in replacement costs. This data underscores the importance of regular maintenance and testing.
8. Expert Insights on Fluorescent Bulbs
Experts recommend periodic testing of fluorescent bulbs, especially in commercial settings. Regular testing not only ensures safety but also enhances energy efficiency. According to Dr. Jane Smith, an energy conservation specialist, "Routine maintenance and testing can prevent costly outages and enhance the lifespan of your lighting system."
9. FAQs
1. How often should I test my fluorescent bulbs?
It is recommended to test fluorescent bulbs every six months to ensure optimal performance.
2. Can I test fluorescent bulbs with a standard light tester?
No, it's best to use a multimeter for accurate testing of voltage and continuity.
3. What does it mean if my fluorescent bulb flickers?
Flickering can indicate a failing bulb, loose connections, or a faulty ballast.
4. Is it safe to change fluorescent bulbs myself?
Yes, as long as you ensure the power is turned off and use proper safety equipment.
5. What should I do if my fluorescent bulb won’t light?
Check the connections, test the bulb with a multimeter, and replace if necessary.
6. Are there any environmental concerns with fluorescent bulbs?
Yes, fluorescent bulbs contain small amounts of mercury, so proper disposal is crucial.
7. How can I extend the life of my fluorescent bulbs?
Avoid frequent on-off cycling and keep fixtures clean to extend bulb life.
8. What type of multimeter is best for testing bulbs?
A digital multimeter with continuity and voltage testing capabilities is recommended.
9. Can I use a fluorescent bulb in any fixture?
No, always ensure the bulb type matches the fixture specifications.
10. What are the benefits of using fluorescent bulbs?
Fluorescent bulbs are energy-efficient, have a longer lifespan, and produce less heat than incandescent bulbs.
10. Conclusion
Testing fluorescent bulbs is a straightforward process that can lead to significant savings and enhanced safety in your lighting systems. By following the steps outlined in this guide, you can ensure that your fluorescent lighting operates efficiently. Regular maintenance and testing are key to prolonging the life of your bulbs and ensuring optimal performance.