Ultimate Guide to Wrapping Beams: Techniques, Tips, and Tricks

-
Quick Links:
- Introduction
- Understanding Beams
- Reasons for Wrapping Beams
- Materials for Wrapping Beams
- Step-by-Step Guide to Wrapping Beams
- Expert Insights
- Case Studies
- Common Mistakes to Avoid
- Maintenance Tips for Wrapped Beams
- FAQs
Introduction
Wrapping beams is an excellent way to enhance the aesthetic appeal of your home while also providing protection to structural elements. Whether you have exposed wooden beams in your living room or steel beams in your commercial space, wrapping them can transform their appearance and contribute to your overall interior design.
Understanding Beams
Beams are horizontal structural elements that help support loads. They come in various materials, including wood, steel, and concrete. Understanding the type of beam you are working with is crucial for selecting the right wrapping technique and materials.
- Wooden Beams: Known for their warmth and character, wooden beams are often used in residential settings.
- Steel Beams: Common in commercial properties, steel beams offer strength and versatility.
- Concrete Beams: Used in heavy construction, concrete beams can also be wrapped for aesthetic purposes.
Reasons for Wrapping Beams
There are several compelling reasons to wrap beams, including:
- Aesthetic Appeal: Wraps can enhance the visual appeal, making a space feel more cohesive.
- Protection: Wrapping can protect beams from moisture, insects, and wear.
- Insulation: Insulating wraps can improve energy efficiency.
Materials for Wrapping Beams
Choosing the right materials is essential for effective beam wrapping. Here are some popular options:
- Fabric: Soft materials like canvas or upholstery fabric can create a warm, inviting look.
- Wood Veneer: A thin layer of wood can give the appearance of solid wood without the weight.
- Foam: For insulation purposes, foam wraps can be effective, especially for outdoor beams.
- Vinyl: Durable and easy to clean, vinyl wraps are a great choice for high-traffic areas.
Step-by-Step Guide to Wrapping Beams
Wrapping beams can be a DIY project if you follow the right steps. Below is a comprehensive guide:
Step 1: Measure the Beam
Accurate measurements are crucial. Use a measuring tape to determine the length and width of the beam.
Step 2: Select Your Material
Choose the appropriate wrapping material based on your design preferences and the beam's function.
Step 3: Prepare the Surface
Clean the beam thoroughly to remove any dust or debris. If necessary, sand any rough spots.
Step 4: Cut the Material
Cut your wrapping material to size, leaving extra for overlap and securing edges.
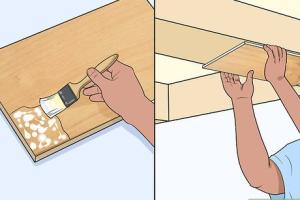
Step 5: Apply Adhesive
Use a strong adhesive suitable for the material chosen. Apply it evenly to ensure a secure bond.
Step 6: Wrap the Beam
Start wrapping from one end of the beam, applying pressure as you go to ensure a smooth finish.
Step 7: Secure the Edges
Use additional adhesive or staples to secure the ends of the wrap, ensuring no loose edges.
Step 8: Finish Up
Inspect the wrapped beam for any imperfections and make adjustments as necessary.
Expert Insights
According to interior designer Jane Doe, "The key to a successful beam wrapping project is to choose materials that complement your existing decor. Don't be afraid to experiment with colors and textures!"
Case Studies
Here are some real-world examples of successful beam wrapping projects:
Case Study 1: Residential Living Room
A homeowner transformed their rustic wooden beams by wrapping them in a soft fabric, creating a cozy and inviting atmosphere.
Case Study 2: Commercial Office Space
A tech company used sleek vinyl wraps on exposed steel beams, enhancing the modern aesthetic of their office.
Common Mistakes to Avoid
- Ignoring Surface Preparation: Clean surfaces ensure better adhesion.
- Overstretching Material: This can lead to wrinkles or damage.
- Neglecting to Secure Edges: Loose edges can lead to peeling.
Maintenance Tips for Wrapped Beams
To prolong the life of your wrapped beams, consider these maintenance tips:
- Regularly inspect for wear and tear.
- Clean with appropriate cleaning agents based on material.
- Address any damage immediately to prevent further issues.
FAQs
1. What materials can I use to wrap beams?
You can use fabric, wood veneer, vinyl, or foam, depending on your aesthetic and functional needs.
2. How long does it take to wrap a beam?
The time required depends on the size of the beam and your experience, but most projects can be completed in a few hours.
3. Can I wrap beams outdoors?
Yes, but ensure you use weather-resistant materials.
4. Do I need special tools to wrap beams?
Basic tools like a measuring tape, scissors, and adhesive are typically sufficient.
5. How do I remove a beam wrap?
Carefully peel back the material, and use adhesive remover if necessary.
6. Is wrapping beams a DIY project?
Yes, it can be a DIY project if you follow the right steps and safety precautions.
7. How much does beam wrapping cost?
Costs vary based on materials and size, but it can be budget-friendly if you do it yourself.
8. Can I paint wrapped beams?
Yes, but ensure the paint is compatible with the wrapping material.
9. Will wrapping affect the beam's structural integrity?
No, as long as you use lightweight materials and proper techniques.
10. What are the best practices for maintaining wrapped beams?
Inspect regularly, clean appropriately, and address any damage immediately.
Random Reads
- How to start windows 10 in safe mode command prompt
- How to use microsoft word 2007
- How to use macros in excel
- How to remove red wine stain hardwood floor
- How to remove programs windows 7
- How to use a vacuum pump
- How to use a toilet brush
- How to make a user account an administrator in windows 8
- How to view source code
- How to view your web browser history