Master the Art of Daisy Chaining Lights: A Comprehensive Guide for Homeowners

-
Quick Links:
- Introduction
- What is Daisy Chaining?
- Benefits of Daisy Chaining Lights
- Safety Considerations
- Tools and Materials Needed
- Step-by-Step Guide to Daisy Chaining Lights
- Case Studies
- Expert Insights
- FAQs
Introduction
Daisy chaining lights is a practical and efficient method to illuminate your space without the clutter of multiple electrical outlets. Whether you're looking to enhance your home decor, set up an outdoor lighting system, or simply want to create an inviting ambiance, understanding how to daisy chain lights can be immensely beneficial.
This guide will walk you through everything you need to know about daisy chaining lights, from the basics to advanced techniques, ensuring you can achieve your lighting goals safely and effectively.
What is Daisy Chaining?
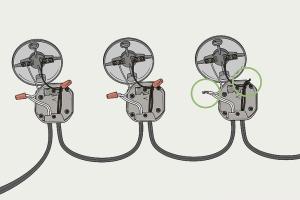
Daisy chaining refers to the practice of connecting multiple lighting fixtures in a series, allowing them to share a single power source. This technique is commonly used in various settings, including homes, gardens, and commercial spaces. By linking fixtures together, you can simplify your wiring and reduce the number of electrical outlets needed.
Benefits of Daisy Chaining Lights
- Cost-Effective: Reduces the need for additional wiring and outlets.
- Ease of Installation: Simplifies the electrical setup and minimizes installation time.
- Flexibility: Allows for easy adjustments and rearrangements of lighting fixtures.
- Enhanced Aesthetics: Creates a cleaner and more organized appearance.
Safety Considerations
When daisy chaining lights, safety should be your top priority. Here are essential safety considerations:
- Ensure the total wattage of all connected fixtures does not exceed the circuit's capacity.
- Use appropriate gauge wiring to handle the load.
- Install fixtures rated for daisy chaining.
- Consult an electrician if unsure about electrical codes and safety measures.
Tools and Materials Needed
Before beginning your daisy chaining project, gather the following tools and materials:
- Wire stripper
- Screwdriver
- Electrical tape
- Wire connectors
- Light fixtures
- Extension cords (if necessary)
Step-by-Step Guide to Daisy Chaining Lights
Follow these steps to daisy chain your lights effectively:
Step 1: Plan Your Layout
Decide on the layout of your light fixtures. Consider the distance between each fixture and the power source.
Step 2: Measure and Cut Wiring
Measure the required length of wiring for each segment and cut accordingly.
Step 3: Strip the Wires
Use the wire stripper to remove insulation from both ends of each wire segment.
Step 4: Connect the Fixtures
Connect the wires to each light fixture, ensuring proper polarity (positive and negative connections).
Step 5: Secure Connections
Use wire connectors and electrical tape to secure all connections, ensuring they are tight and insulated.
Step 6: Test the Circuit
Before finalizing your installation, test the circuit to ensure all fixtures are functioning correctly.
Step 7: Finalize Installation
Once everything is tested, mount the fixtures securely and tidy up any visible wiring.
Case Studies
Let's explore some real-world examples of successful daisy chaining:
Case Study 1: Outdoor Garden Lighting
A homeowner created a beautiful outdoor space by daisy chaining string lights along a garden pathway. By connecting the lights in series, they minimized extension cords and achieved a uniform glow.
Case Study 2: Office Space Illumination
An office manager used daisy chaining to connect desk lamps throughout an open office layout. This approach allowed for adjustable lighting while maintaining an organized and professional look.
Expert Insights
We spoke with electrical engineers and lighting designers to gather insights on best practices for daisy chaining lights.
According to John Smith, an electrical engineer, "Understanding the load capacity of your circuit is crucial. Always prioritize safety over aesthetics when it comes to electrical installations."
FAQs
- What is the maximum number of lights I can daisy chain? The maximum depends on the wattage and the circuit's capacity. Always check the specifications.
- Can I daisy chain different types of lights? Yes, but ensure they are compatible in terms of voltage and wattage.
- Is daisy chaining safe? Yes, if done correctly and within electrical safety guidelines.
- What should I do if a light in the chain goes out? Check the connections and the bulb. If others are still working, the issue is likely isolated.
- Do I need to use special wiring for daisy chaining? Use wiring rated for the voltage and load you’ll be working with.
- Can I daisy chain outdoor lights? Yes, but ensure they are rated for outdoor use and protected from moisture.
- How do I know if I’m overloading a circuit? If breakers trip frequently or lights flicker, you may be exceeding capacity.
- What tools do I need to daisy chain lights? Basic tools include wire strippers, screwdrivers, and electrical tape.
- Can I daisy chain LED lights? Yes, LED lights are often designed for daisy chaining and can be very efficient.
- Is it possible to daisy chain lights without an electrician? Yes, if you follow safety guidelines and are comfortable with basic electrical work.
By following this comprehensive guide, you can master the art of daisy chaining lights, enhancing your spaces while ensuring safety and efficiency. Whether you're a DIY enthusiast or a homeowner looking to upgrade your lighting, the techniques and insights provided here will help you succeed in your project.