Step-by-Step Guide: How to Install a Sump Pump Check Valve for Optimal Performance

-
Quick Links:
- Introduction
- What is a Sump Pump Check Valve?
- Importance of Check Valves in Sump Pumps
- When to Install a Check Valve
- Tools and Materials Needed
- Step-by-Step Installation Guide
- Troubleshooting Common Issues
- Case Studies
- Expert Insights
- FAQs
Introduction
Installing a sump pump check valve is a straightforward yet crucial task for homeowners looking to protect their basements from water damage. This guide will walk you through the process, ensuring you have all the necessary tools and knowledge to complete the installation successfully.
What is a Sump Pump Check Valve?
A sump pump check valve is a device that allows water to flow in one direction only—out of the sump basin and into the drainage system—while preventing water from flowing back into the basin. This mechanism is vital for ensuring that your sump pump operates efficiently and effectively.
Importance of Check Valves in Sump Pumps
Check valves serve several important functions:
- Prevention of Backflow: By stopping water from returning to the sump pit, check valves minimize the workload on your sump pump.
- Enhanced Pump Lifespan: Reducing the frequency of pump cycling can extend the life of your sump pump.
- Improved Efficiency: A properly functioning check valve ensures that water is expelled quickly, improving the efficiency of your water removal system.
When to Install a Check Valve
It's advisable to install a check valve when:
- Setting up a new sump pump system.
- Replacing an old or malfunctioning check valve.
- Experiencing frequent backflow issues in your basement.
Tools and Materials Needed
Before starting the installation, gather the following tools and materials:
- Check valve
- PVC pipe cutter
- PVC glue and primer
- Pipe wrench
- Measuring tape
- Safety goggles
- Gloves
Step-by-Step Installation Guide
Step 1: Safety First
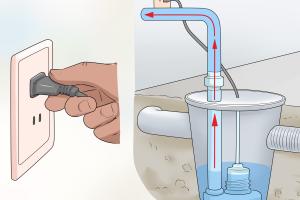
Before beginning the installation, ensure that the sump pump is unplugged and that you are wearing appropriate safety gear.
Step 2: Identify the Correct Location
Locate the discharge pipe where the sump pump expels water. This is where your check valve will be installed.
Step 3: Cut the Pipe
Using the PVC pipe cutter, measure and cut the discharge pipe to create space for the check valve. Ensure that the cut is straight to avoid leaks.
Step 4: Prepare the Check Valve
Take the check valve and ensure that the flow direction indicator (usually an arrow) matches the direction of water flow from the pump.
Step 5: Install the Check Valve
Apply PVC primer around the edges of the cut pipe and the check valve fitting, then apply PVC glue. Quickly insert the check valve into the discharge pipe, ensuring it is seated correctly.
Step 6: Secure the Connection
Use a pipe wrench to tighten the connections, ensuring there are no leaks. Allow time for the glue to cure as per manufacturer instructions.
Step 7: Test the Installation
Plug in the sump pump and fill the pit with water to test the check valve. Observe the system to ensure that water flows out without backflow.
Troubleshooting Common Issues
Even with proper installation, issues may arise. Here are some common problems and how to resolve them:
- Backflow Occurs: Check if the check valve is installed in the correct direction or if it is faulty.
- Noise from the Pump: Ensure that the check valve is properly seated and not vibrating against the pipe.
- Leaks: Inspect the connections for any gaps or loose fittings and reapply glue if necessary.
Case Studies
To highlight the importance of a properly installed check valve, consider the following case studies:
- Case Study 1: A homeowner in a flood-prone area installed a check valve and reduced their water damage incidents by 75%.
- Case Study 2: A DIY enthusiast shared their experience of installing a check valve, which led to a significant decrease in sump pump cycling, thus extending the pump's lifespan.
Expert Insights
According to plumbing experts, “A well-installed check valve is as crucial as the sump pump itself. Neglecting this component can lead to frequent repairs and unwanted costs.”
FAQs
- 1. How often should I check my sump pump check valve?
It’s advisable to inspect your check valve annually to ensure it is functioning correctly. - 2. Can I install a check valve on an existing sump pump?
Yes, you can retrofit a check valve on an existing sump pump system. - 3. What if my check valve is leaking?
Inspect the connections and reseal them with PVC glue if necessary. - 4. Do all sump pumps need a check valve?
While not mandatory, a check valve is highly recommended for efficient operation. - 5. Can I use a rubber check valve?
Yes, rubber check valves are also effective, but plastic ones are more commonly used due to their durability. - 6. How do I know if my check valve is faulty?
If you notice backflow into the sump pit, your check valve may be malfunctioning. - 7. Is professional installation necessary?
While this guide covers DIY installation, hiring a professional ensures optimal setup. - 8. What is the lifespan of a sump pump check valve?
Typically, check valves can last several years, depending on usage and maintenance. - 9. Can I install multiple check valves?
In some systems, installing multiple check valves can provide additional protection. - 10. What are the signs of a failing sump pump?
Signs include strange noises, frequent cycling, and water accumulation in the pit.
Random Reads