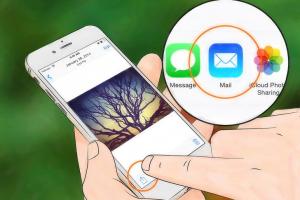
Effortless Ways to Email Pictures from Your Cell Phone

-
Quick Links:
- Introduction
- Method 1: Using the Native Email App
- Method 2: Using Third-Party Apps
- Case Studies and Examples
- Expert Insights on Mobile Photo Sharing
- Statistical Data on Mobile Usage
- Conclusion
- FAQs
Introduction
In today's digital age, sharing photos has never been easier. Your smartphone is packed with high-quality cameras, making it simple to capture moments. However, when it comes to sending those images via email, many users find themselves at a loss. This article will guide you through two straightforward methods for emailing pictures from your cell phone, ensuring you can share your memories effortlessly.
Method 1: Using the Native Email App
Most smartphones come equipped with a native email application that allows users to send emails directly from their devices. Here’s a step-by-step guide on how to do it:
Step 1: Open Your Native Email App
Locate the email application on your device. This is typically represented by an envelope icon. Tap to open it.
Step 2: Compose a New Email
Once the app is open, look for the “Compose” or “New Email” button. This is usually found at the bottom right corner of the screen.
Step 3: Add Recipient and Subject
In the “To” field, enter the recipient's email address. In the “Subject” line, include a brief description of the email content.
Step 4: Attach Your Pictures
To attach your pictures, look for a paperclip icon or an “Attach” button. This will open your photo gallery:
- Select the images you wish to send.
- Once selected, tap “Done” or “Attach” to confirm.
Step 5: Send the Email
After attaching your photos, you can add any additional text in the body of the email. Finally, hit the “Send” button, and your email will be on its way!
Method 2: Using Third-Party Apps
Sometimes you may prefer using third-party applications to send pictures via email. Apps like Gmail, Outlook, or specialized photo-sharing apps offer enhanced features. Here’s how to use Gmail, for example:
Step 1: Download and Install the App
If you don’t have Gmail installed, download it from your device’s app store and log in with your Google account.
Step 2: Start Composing an Email
Open the app and tap the “Compose” icon. Similar to the native app, enter the recipient’s email and the subject.
Step 3: Attach Photos from Your Gallery
Tap the “Attach” icon (paperclip) and select “Insert from Drive” or “Insert from Photos,” depending on where your images are stored.
Step 4: Send Your Email
After attaching your pictures, review your email and click “Send.” Your images will be sent promptly.
Case Studies and Examples
To better understand how these methods work in real life, let’s look at a couple of examples:
Example 1: Family Reunion
Jane attended a family reunion and captured several pictures. Using her native email app, she quickly sent photos to family members who couldn’t attend. This helped to keep the family spirit alive, showcasing her seamless experience.
Example 2: Business Presentation
Tom was preparing for a business presentation and needed to share his visuals with colleagues. He opted for the Gmail app, utilizing the cloud storage feature to send high-resolution images without loss of quality. This approach not only saved time but also ensured everyone received the best version of his work.
Expert Insights on Mobile Photo Sharing
Experts in digital communication suggest that mobile photo sharing is evolving. Here are a few insights:
- Mobile usage continues to grow, with approximately 75% of Internet users accessing websites via smartphones.
- High-quality images are essential for engagement. Sending photos via email can maintain image quality, unlike some social media platforms.
- Third-party apps often offer better tools for organizing and sending images, including batch uploads and categorization.
Statistical Data on Mobile Usage
According to recent studies:
- Over 50% of emails are now opened on mobile devices.
- The average person has over 600 photos on their smartphone.
- Emails with images can increase engagement by up to 42%.
Conclusion
Emailing pictures from your cell phone is a straightforward process that can be accomplished using your device’s native email app or third-party applications. By following these methods, you can ensure that your cherished moments are shared easily and effectively.
FAQs
1. Can I send high-resolution images via email?
Yes, most email applications allow you to send high-resolution images, but keep in mind the attachment size limits.
2. What is the maximum file size I can send via email?
The maximum file size varies by provider, but it’s often between 25MB to 50MB.
3. Do I need an internet connection to email pictures?
Yes, an active internet connection is required to send emails.
4. Can I send multiple pictures at once?
Yes, both native and third-party apps allow you to attach multiple pictures in one email.
5. What if my pictures aren’t sending?
Check your internet connection, file size, and ensure you’re not exceeding the attachment limit.
6. Can I send videos via email as well?
Yes, you can send videos, but they also have size limits, similar to photos.
7. Is there a way to compress my images before sending?
Yes, many apps offer options to resize or compress images before sending.
8. Are there any privacy concerns when emailing pictures?
Always ensure you’re sending images to trusted recipients to maintain privacy.
9. Can I retrieve sent pictures from my email?
Once sent, you cannot retrieve the images, but the recipient will have them in their inbox.
10. What should I do if my email app crashes when attaching pictures?
Try restarting the app or your phone, and ensure you have enough storage space available.
Random Reads